• Skip to main content
  • Skip to footer

The Horses Back

Body Talk for Thinking Owners

  • Home
  • Articles
  • BEMER
  • Store
    • Store
    • Shipping
    • Returns
    • Payment Plans
    • Support
  • Equine Healthworks
    • Bodywork Services
    • Bodywork Approach
    • Calendar and Rates
    • Request a Session
  • About & Contact
    • Reviews
      • Write a Review
    • Socials
    • Podcasts
    • About
    • Contact

Jane @ THB

Introducing Common Saddle Fit Problems in Arabian Horses

December 12, 2024 by Jane @ THB 7 Comments

Arabian saddle fitting can be complex

Achieving good saddle fit with Arabian horses can be challenging on account of some breed-typical features that make their backs somewhat complicated. You can correct one issue and run immediatley into another, for there’s often very little wriggle room when it comes to the Arabian back.

Of course, not all horses in a single breed are the same, as there are many variations in conformation and posture. However, saddle fitters usually agree that Arabians can be the trickiest of customers to fit.

This post introduces some commonly seen issues, so you can look at your Arabian’s body with a clearer understanding of what’s happening with a saddle (mis)fit, and what you need to be looking for as you try to move forwards.
The Arabian Horse and Saddle Fit Problems

Here are the conformational points that feed into many Arabian saddle fit issues. Arabians display some or all of these features:

  • Compact and short-coupled
  • Wide flat back
  • Well sprung ribcage
  • Long set back withers
  • High croup

The combination of these features varies between the main strains of Arabians as well as individual breeding lines.

Briefly, strains are breed subgroups, often named after the Sheikhs or tribes that bred them. Each strain has subtle variations in physical features, temperament, and abilities. Some are pictured in this post, purely to help us see the influences on modern conformation more clearly.

To make these features’ interaction in saddle fit easier to understand, I’ve organised these conformation points within three sections in this post.
1. A Short Wide Back

As a breed, Arabians probably come with more legends attached than any other. One of these is usually accepted without question: that the breed has one fewer rib than other breeds.

If you talk to an equine anatomist with decades of experience, you’ll hear that most Arabians have the regular number of thoracic vertebrae (18), but some have fewer lumbar vertebrae (five instead of six).

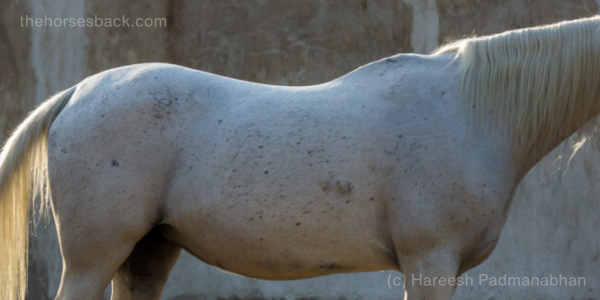
This does shorten the back overall and brings the last rib closer to the point of hip, creating a short-coupled horse.
The Arabian back is typically both short and wide. 


How does this affect saddle fit on its own?

First, the round ribcage may lead to the saddle rolling. As it is usually accompanied by a forward girth ‘groove’, choice of girth becomes especially important.

An anatomical girth that clears the elbows and is wider in the centre (for a wide barrelled horse with a flat sternal area) may assist with stabilising the saddle.
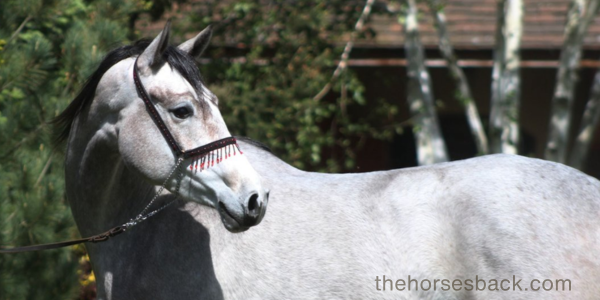
A short, well rounded back is evident in these images of the Kuhaylan strain. “Known for strength and a compact build, horses of this strain are considered the classic desert warhorse. They have a reputation for courage and endurance.”


So as well as clearing the wither, the saddle must be wide enough to accommodate the ribcage and well-muscled back in the fit horse.

Western trail saddles recommended for Arabians have shorter skirts with wider gullets, and a bit more curve along the length. English style saddles are usually wide, with wider, flatter and thinner panels.
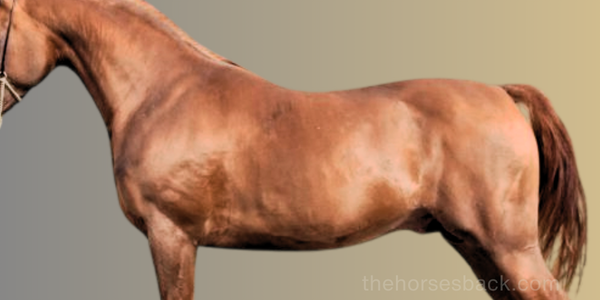
This horse has more back length, yet still presents the long low wither and a forward girth line.

2. Low to Medium Withers

The saddle area is shortened by the long set-back wither, which is an aspect of the deep chest, high set neck, and laid back shoulder.

As well as being long, Arabian withers are frequently low and well-covered, with heavy muscle at their base.

A wide, hoop style tree is often the answer for English style saddles.

Western saddles, as well as being shorter with rounded skirts that won’t impact the point of hip, may have need to have more flare in the bars to accommodate the wide shoulders and scapular movement.
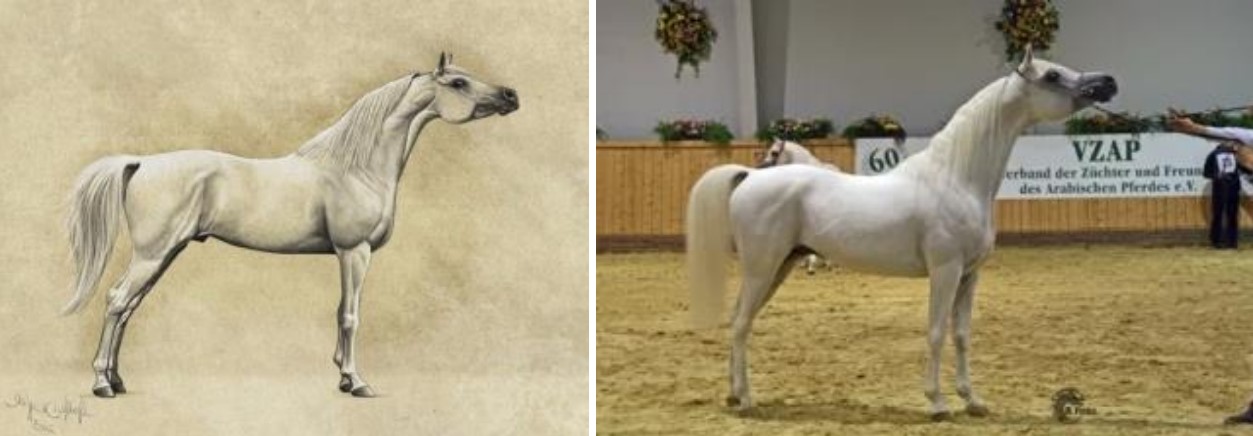
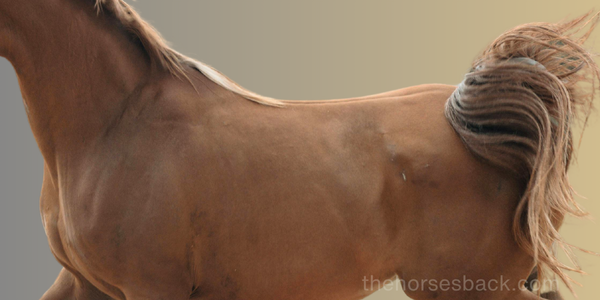
Long substantial withers are visible in The Dahman: “This strain is known for producing horses with a balanced combination of beauty, power, and endurance. Dahman horses are often prized for their strong, athletic build and good temperament.”


Arabians may also have withers of a more middling height, which also widen out into a rounded ribcage. If the horse’s back is fairly flat along the topline, then the tree and panels need to be straighter too.
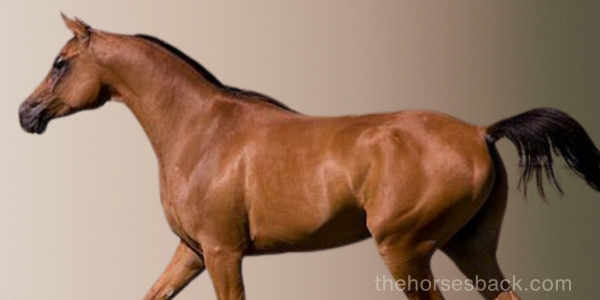
These withers extend well back into the saddle area, with an extremely well-sprung rib cage.


With these horses, the saddle gullet needs to be higher, but still have enough width to accomodate the shoulder and rib cage. (Of course, if the horse is a lot finer, then narrow may be what is needed.)

Fitting around the broad muscle at the base of the neck is not achieved by simply widening a synthetic saddle by swapping gullet plates – doing so will make the saddle more curved along its length, which isn’t suitable for a horse with a straight back. On these horses, the saddle may rock.

3.  Height of Croup

Arabians are known for their relatively long, level croup (top of the hindquarters) and naturally high tail carriage. The height of the pelvis at the sacral tuberosities (the bony peak) may be as high as the withers, or indeed higher. This may be obscured in images where the horse’s hind legs are extended out.
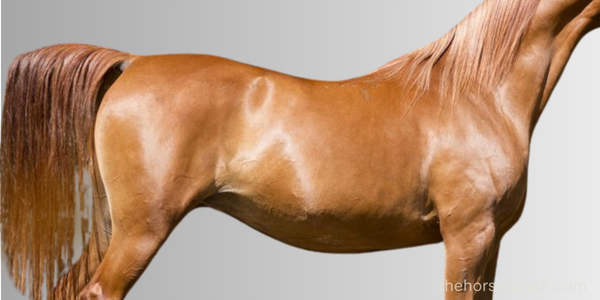
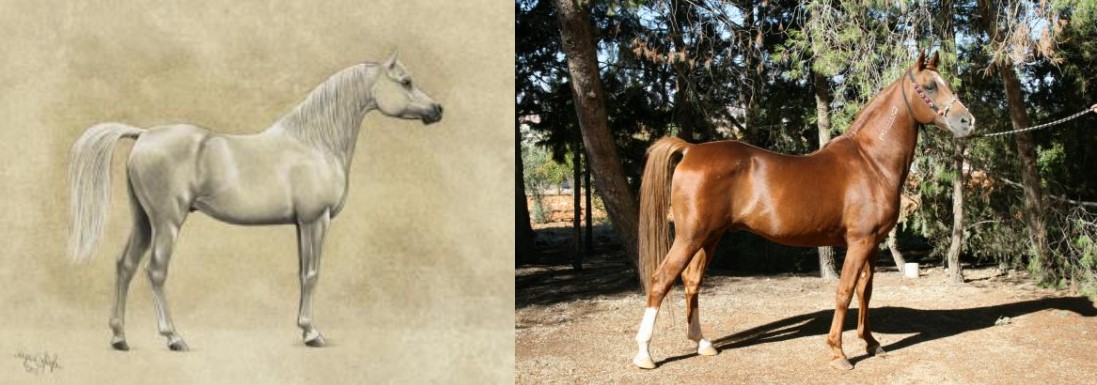
This short-backed Arabian has a level croup that might become higher than the withers once the hind feet come forward.

There is already a potential issue because when the lumbar spine is short, it must sweep up to the pelvis at a steeper angle than with a longer lumbar spine.

Add to this a topline built from full curves – the Arabian’s famous flowing lines – and a definite dip in the thoracic spine (saddle area). The upward sweep to the pelvis is now more accentuated.

A postural issue also comes into play, as a naturally high head carriage dips the spine further (ie. hollowing the back).
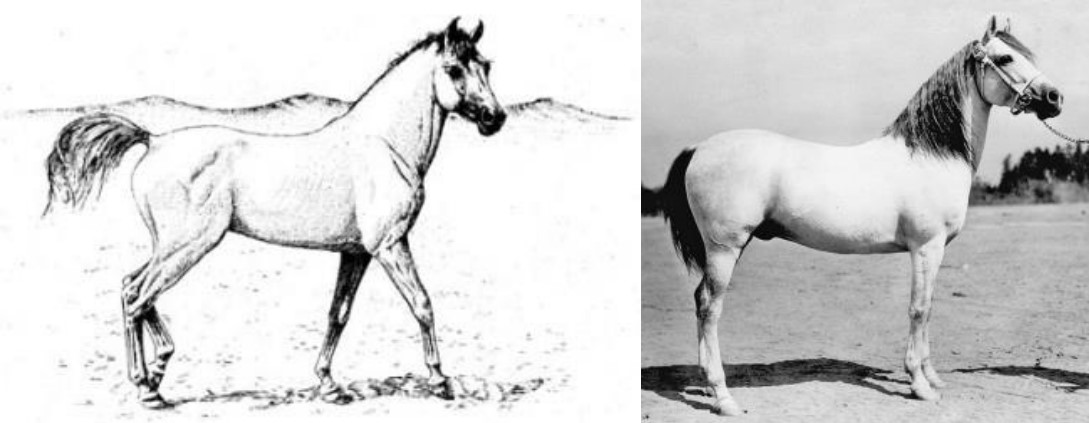
 

The Hamdani strain. “Slightly taller and longer in frame … known for their powerful builds and strong backs, Hamdanis are excellent for endurance.”

Two things can now be happening.

If low broad withers are accompanied by a higher croup, there may be issues with the saddle sliding forwards. The saddle may be unstable and will roll easily on the horse’s rounded body – more so than if the croup is level with the withers.

The bigger issue is that the saddle may bridge between the lumbar muscles and the set back withers and muscles, creating pressure at these points.

If both of the above are happening at once, the saddle may both press into the shoulders and roll from side to side, creating a very uncomfortable and potentially painful experience for the horse, and little stability for the rider.
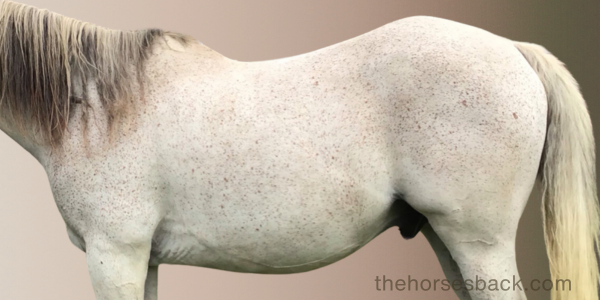
Away from the show ring and equine sports, extremely high croups can be seen in domestically bred horses. (c) J Clothier


In these cases, saddles may need shorter tree and panels to avoid resting on the upswept lumbar spine.

But it can’t be small: it still needs sufficient width to clear the spine and the withers, and to sit across those wide back muscles with a good, even contact.


The Complex Arabian 

As we can see, the combined issues that can arise with Arabian conformation require us to think about the shape of the saddle tree along every inch of its length and width.

Only once their complicated conformation is understood, can great saddle fit be achieved.
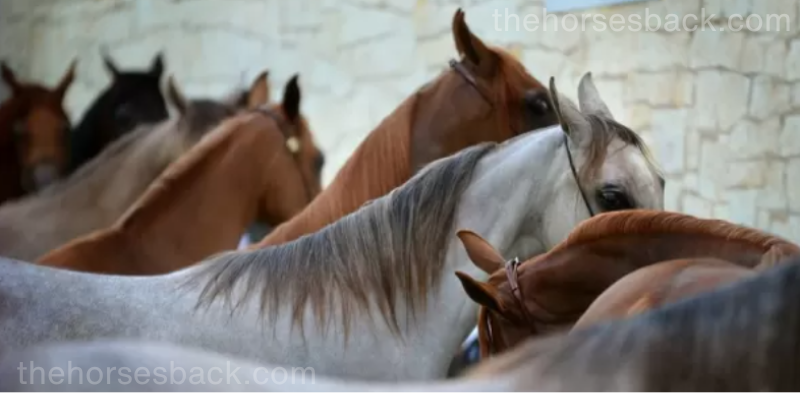


Thankfully, there are many saddles out therem including Arabian-specific models, which are becoming more and more finely tuned.

It has to be said we must thank the world of endurance riding for many of the more innovative solutions, with special designs created to accomodate the conformation and movement of this remarkable breed.


Useful saddle fitting resources

This article introduces the problems, so what about solutions?

The following resources provide more information on getting your saddle fit right (I’ll add more soon!)

Western Saddle Fit – The Basics 67-minute video on DVD or Vimeo streaming from Rod and Denise Nikkel

Western Saddle Fit: Well Beyond the Basics 6 hours for equine professionals from Rod and Denise Nikkel

The Horse’s Pain-Free Back and Saddle-Fit Book eBook from Joyce Harman DVM

The Western Horse’s Pain-Free Back and Saddle-Fit Book Soundness and comfort with back analysis and correct use of saddles and pads, from Joyce Harman DVM

Saddlefit4Life YouTube channel presents numerous educational videos, from Jochen Schleese of Schleese Saddlery.
Filed Under: Saddle Fit Tagged With: arab horses, arab saddle fit, arab saddle fitting, Arabian horses, arabian saddle fitting, GA, saddle fit, saddle fitting

Why Do Horse Owners Keep Hiring Unqualified Equine Chiros?

November 14, 2024 by Jane @ THB 2 Comments

Let’s take a moment to talk about unqualified equine chiropractors.

I’m not talking about veterinary chiropractors, or those who’ve trained with well-regarded institutes. These are professionals who approach a horse with a safe pair of hands and a head full of knowledge.

I’m talking about the ones we could loosely call the whackers and crackers. The ones who lean right in when they’re pushing, and who lean right back when they’re pulling – because that’s how you adjust a great big ol’ horse.

These are the guys – and the majority are male – who do the endless rounds of repeat visits, adjusting the same horses over and over.

And who often deliver on-the-spot diagnoses, despite never having had a day’s veterinary training in their life.

Note: This is the first of two posts. Once you’ve read this, take a look at Hiring an Equine Chiropractor: 10 Crucial Questions You Need to Ask

Right, but my chiro is great

Of course, many people will say yes, they know there are bad chiros out there, but their chiro is great and really helps their horse, so what’s the problem?

The problem is this. When everything’s going right and all is well, the problem won’t be seen. Yet when a mistake is made, the outcome can be disastrous.

This is because chiropractors perform moves that can be invasive. This means that a result is achieved by applying a direct physical pressure that the horse’s body can’t resist or avoid.

Let’s look at how that plays out in practice.

The nature of the chiropractic move

1. Untrained chiropractors

The moves unqualified chiropractors perform are what is called high velocity, non-specific joint adjustments, and they’re usually made with long lever techniques. For example, a leg is moved at high speed to address a series of vertebral joints, or a number of joints in the leg.

These moves may take joints beyond, just beyond or even well beyond their usual range of motion. It all varies according to the level of skill involved. The joints may have different limitations, but the individual assessment isn’t always there.

2. Qualified chiropractors

A highly trained chiropractor who is a vet or who has an accredited qualification performs specific, high velocity and low amplitude (HVLA) adjustments. Here’s one definition of HVLA: it’s “a rapid use of force over a short duration, distance, and/or rotational area within the anatomical range of motion of a joint to engage the restrictive barrier in one or more planes of motion to elicit the release of restriction.” (LaPelusa, 2023.)

Note the word ‘anatomical’ – this is where a healthy joint should be able to move. This is different to the physiological range of motion, which is where a joint is currently able to move, given the issues that might be limiting it.

Why high-level training is important

Sounds complicated? Well, that’s because it is – and so it should be.

When it comes to chiropractic adjustments, the specific location and angle needs to be spot on, as if performed incorrectly, they can cause damage.

If you’re going to go past the physiological to reach the anatomical range of motion, then you need to know exactly where each of those is. You also need to understand the tissue structures and issues that might be limiting the joint’s movement.

Based on that information, there are times when a move shouldn’t be performed at all.

A qualified chiropractor knows exactly where and what the locations and angles are, and understands the tissue damage, conditions and restrictions that mean a move shouldn’t be made (called ‘contraindications’). This involves nerve function as well.

The unqualified chiros, not so much.

This is not something you can just pick up as you go along, because you’ve always been around horses, or heard about it from some bloke you used to work with at the racing stables.

Because get it wrong and force a joint too far at the wrong time, and matters can go south very quickly indeed. The consequences can be minor, but equally they can be disastrous.

It’s a risk many people hiring equine chiropractors don’t even know is there.

10 reasons why unqualified chiros get hired

Let’s be aware of what influences our decisions, including those to hire unqualified chiros. (And I’ll own here that I’ve been impressed by the wrong people at times in the past, so I’ve no intention to judge people who are trying their best.)

So, understanding that many people just want to help their horse, here’s the good, the bad and the ugly of this owner decision.

1. The word-of-mouth recommendation is shaky

A friend mentions a name and describes an experience that sounds positive. However, what if they don’t know quite as much as they appear to know?

2. The practitioner has an innate air of authority

A lot of these chiros are used to walking up to racehorses with a manner that demands obedience and stops any trouble before it starts. It sure works, but confident body language doesn’t only work on horses, it convinces people too.

3. Male horse people often prefer male practitioners

A percentage of men do prefer other men to do the job, and view cracking the horse’s body as a practical, fuss-free approach they can relate to. Not all men, of course, but plenty of them.

4.  It’s seen as a physical job that requires a man

This is the belief that the work requires strength, for instance when lifting a solid back leg up without getting kicked. For those who believe it should be done this way, it can follow that a muscled bloke is preferrable. To a horse owner who believes big horse bodies need to be pushed or pulled into alignment because, well, they’re big, then this sure looks impressive.

5.  Men are still seen by many as experts

Sadly, many horse owners, many of whom are female, still seem to believe that an expert man is more expert than an expert woman. I find the chiro’s words are often repeated with such reverence that you’d think he was up there alongside the equine vet. Please women, let’s change this mindset!

6. Some vets still support these chiros

It’s true. Inexplicably, some vets still informally refer to these practitioners who are 100% qualification-free and never do any update training, and even deliver quasi-diagnoses. Meanwhile, an unsuspecting owner absolutely trusts their vet – who would blame them?

7.  The cracks are impressive

That noise. As we know, it’s carbon dioxide gas bubbles escaping the synovial fluid as a joint moves (‘cavitation’), or a ligament or tendon moving suddenly over bone. Yet for the uninformed owner, both of these are the sound of a joint going ‘back in’ and a problem being resolved.

8.  This method does the job and it’s quick

Yes, but so is tying a loose tooth to a door handle and then slamming the door. Does that make it the best or the right intervention, especially when it comes with risks?

9.  It’s cheap

This is naturally seen as a good thing, and for anyone on a tight budget, it is. However, most chiropractors who’ve spent years in expensive education and training can’t afford to give their work away.

10.  There’s nobody else in the area

I understand. Honestly.

So, what can horse owners do?

When choosing an approach, use imagination and engage empathy to think about how you would like your body to be handled.

Next, asking questions before engaging or hiring a professional is a good way to start assessing the level of training and professionalism in the chiro you’re hiring.

Checking the person’s website and checking professional association lists can go some way towards getting answers – once you know what questions you need answering.

That’s why I’ve written this additional post that should help: Hiring a Horse Chiropractor: 10 Crucial Questions You Need to Ask


Note: The images in this post were all sourced in the public domain on social media and third party websites.


Filed Under: Bodywork, Viewpoint Tagged With: equine bodywork, equine chiro, equine chiropractic, equine chiropractor, horse bodywork, horse chiro, horse chiropractic, horse chiropractor

How to Create Better Before And After Photos of Horses (and Spot Misleading Ones)

February 22, 2024 by Jane @ THB 3 Comments

Bodyworkers love before and after photos. Done correctly, they can show great results of our work, making them powerful promotional tools.

Equally, if done incorrectly, they may say something rather different to what we want. In fact, there are many ways to leave areas of doubt and raise viewer questions. That’s why I rarely use them anymore.

To help you avoid some of the pitfalls, here are some pointers for making your before and after bodywork photos more effective.


1.  Make sure the horse is standing relaxed and in the same position

It sounds obvious, but so many people get this wrong.

In some photos, the horse is actually doing different things, or looks as if it has just paused during eating, stepping forward, looking into the distance, etc.

All of these things can change its posture, just as post-bodywork relaxation can. This is not comparing like with like.

The horse needs to be standing in a settled state. Standing square if possible, or otherwise in its default ‘parked’ position.

Either way, all four feet need to be on the ground, even if standing square isn’t possible.


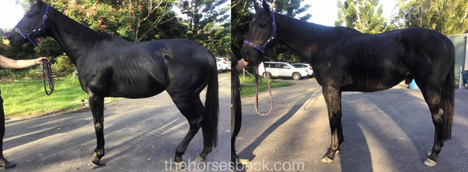
Example 1: When the horse can’t stand comfortably

This OTTB was unable to stand without resting a hindlimb due to his sacroiliac and lumbosacral issues.

While this is part of his problem, and the owner and I knew that, nobody looking at the photos can be expected to know it. He looks like he’s just having a rest. If it’s not self-evident, it’s not worth using.

OTTB with hoof imbalance (negative plantar angles) and sacroiliac issues. Without appropriate hoofcare over time, his problems would simply persist. (c) thehorsesback.com


2. Use the same lens angle

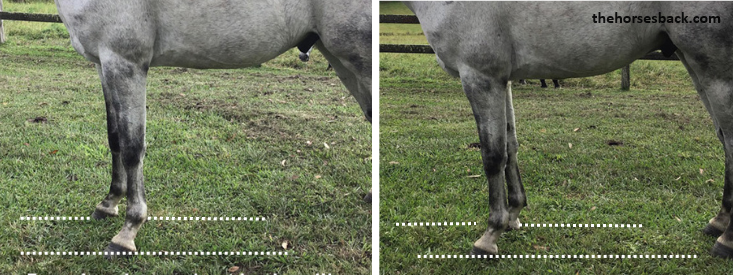
This must be the second biggest error in before and after photos: One photo is taken with the lens angled slightly downwards, while the other is more level. This can unintentionally change how the horse’s outline looks.

Here’s how you can tell.

  • First, look at how the lens is positioned for good square-on conformational photos. It’s usually somewhere on the girthline, pointing horizontally around halfway up the horse’s body.
  • Now create an imaginary tracking line running in front of and behind each front hoof.
  • The distance between these lines should be roughly the same in both photo (when the horse is standing fairly straight).
  • If there’s a wider space in one photo, then the lens is probably angled downwards.
  • To compare like with like, the distance needs to be the same in both.
The distance between imaginary tracking lines can help show whether the lens angle is the same, or close to it. The horse is standing slightly wider in the first image, but the distances are still similar.


3.  Ensure the lighting direction is the same

This is simple to achieve, but so many people get it wrong.

Changes in lighting can highlight or obscure ribs, bony landmarks, tight muscles, you name it. There can be numerous changes to what we’re seeing.

Yet in some photos, the horse is in a different location, it’s a different time of day, or even indoors in one photo, and outdoors in the other.

To get a true and fair representation of the improvements, ensure the set up is close to identical in each photo, so that lighting changes don’t create a false impression.

Your great results need to shine on their own.


Example 2: Poor set up

These age-old, low res photos from my files were only taken as records over 15 years ago. Afterwards, I certainly wished I’d organised the taking of them better.

Taken at the start of session 1 and session 3, they show a change in coat colour. However, the passage of time and his weight gain can also account for this…

This TB had old fence injuries to the hindlimbs and lumbosacral issues. (c)thehorsesback.com

In this age of Canva, it’s not worth trying to explain changes that can come with other explanations.


4.  Take photos in the same season

All too often we see a before photo taken in winter, and an after photo taken in summer.

So guess what? The horse looks worse when it has a long, dull winter coat.

And it looks vastly improved in the summer, when it has a short, gleaming coat. Even more, it has a bellyful of tucker.

It’s better to avoid such a major difference, as it again only serves to obscure your great results.


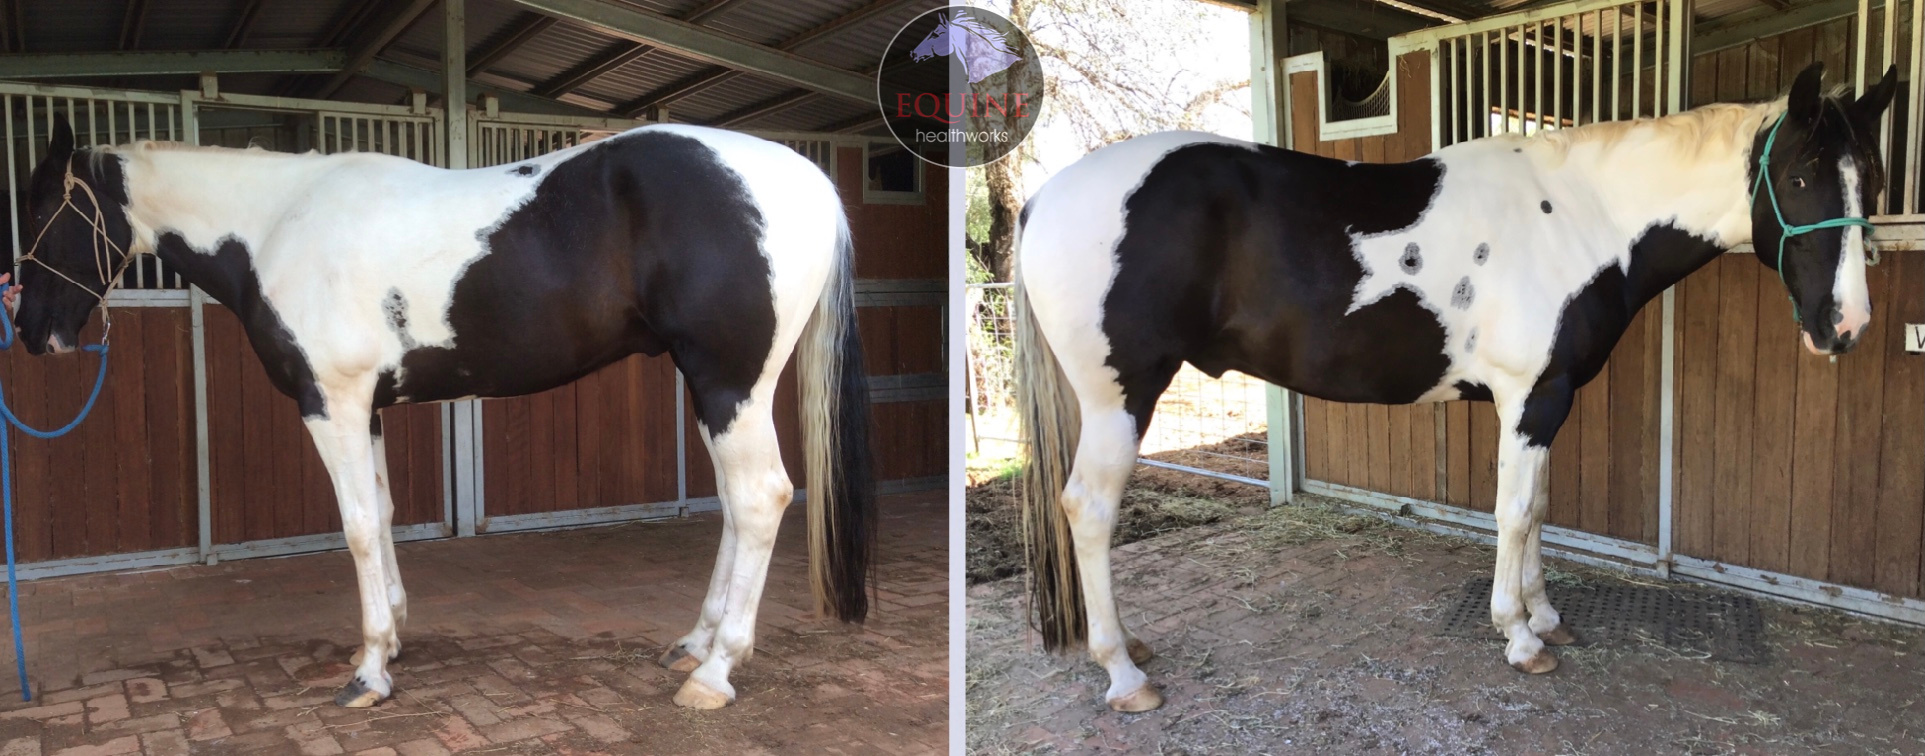
Example 3: When it’s OK to break the rules 

The following photos of the paint horse were originally intended for my personal records. 

Shortcomings are clear: the horse is facing a different way; one photo is not fully square-on; horse is looking at camera; standing in a different location in the yard.

The strengths are big ones: same lens height and angle; lighting similar.

As this is about posture and not muscle development, the changes are unmissable. I gave credit to hoof balance improvement as well as bodywork.  

I would never plan to do a before and after in this way – if this horse’s changes had been minor, the photos wouldn’t have worked at all.


5. Include the legs!

It’s very common to see before-and-after photos showing only the horse’s back from a side-on view, or only the hindquarters from the rear.

This is to leave rather a lot of relevant information out of the image.

Why? Because without the limbs and/or head and neck in the image, your viewer can’t assess the horse’s posture.

Instead, they’re asking themselves questions such as: Is the horse standing square? Is it standing under or camped out? Is it angled away from the camera?

Most importantly, the simple matter of foot placement affects how the back and hindquarters appear in your two photos.

A close up image removes all the reference points that help viewers to understand what the image is supposed to show.

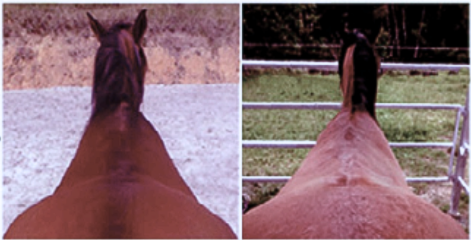
The exception is the overhead view down the back, as the legs obviously can’t be seen. In these cases, including the head and neck is helpful, as it says a lot about posture.

Example 4: Including extra information

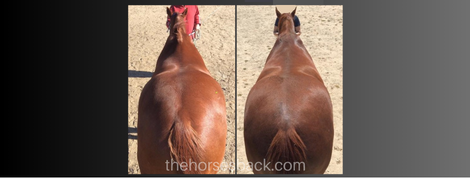
Here are the full images of the WB used in the header for this post.

Both pics were taken in the same spot, but at different hours of the day. I couldn’t alter that, but it did mean that the sunlight was different and this accentuates the shoulder imbalance in the first picture.

What is important is that a lot is included in the images. This allows us to reference that the hindquarters are square-on and the head and neck position close to the same height.

I always explain that that the owner was also doing in-hand training with the horse, and had instigated hoofcare improvements.


6. Select the same stage in the session

You are not comparing like with like if your before photo is taken at the start of a session, and the after photo is taken at the end of a session. You may indeed be showing a valid change in the horse, BUT…

Many therapeutic approaches have a pain-relieving effect, which is often temporary. Posture can temporarily improve.
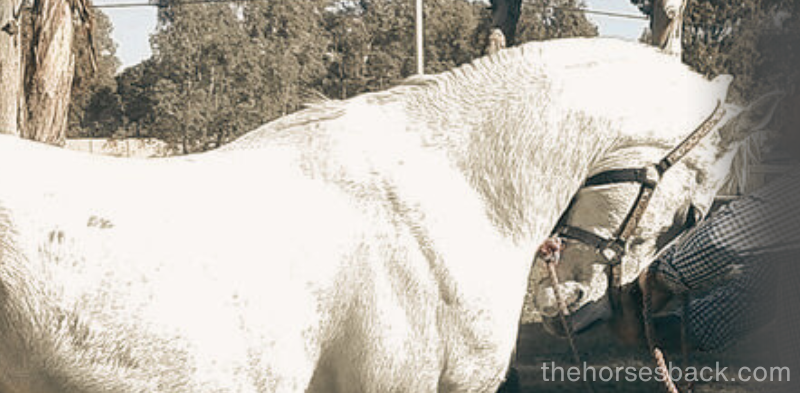
Once the effect wears off, the horse returns to experiencing the uncomfortable effects of its pathologies again. At this point, all the improvements may cease to be visible.

It’s a bit like taking a photo when the horse is on pain relief, and saying ‘here, look at this great change’.

A more valid comparison is to show the horse at the beginning of session one and then at the START of a later session.

This shows how the improvement has held once the horse returned to its regular routine.


Example 5: When a sequence works better

This Arabian was experiencing lumbosacral pain. As with the OTTB earlier, this caused him to constantly rest a hindlimb.

A sequence of photos throughout a session can create an engaging story that is interesting in its own right. (c) thehorsesback.com

A straightforward before and after would have been unconvincing.

On the other hand, a sequence of photos (we have both walks and short breaks during a session) shows him adjusting his posture. This reflects my focus on the day.
 

7.  Tell the whole story
Ahh, now here’s one that many people overlook when putting together before and after photos.

What was the horse doing the day before, or the day before that, or earlier the same day for that matter?

What else has been happening to the horse between visits that may have made a difference?

If the horse had completed a demanding event just before the first photo, then it’s possible that physical tiredness came into play.

If the horse has had rehabilitation in the form of hoofcare, new training or exercise protocols, a change of saddle, etc, between your visits, then that needs to be mentioned.

Hint: veterinary care is also important!


An old, low res image of an Arabian I worked on with fractured withers. The change in shoulder symmetry was due to work on the cervicothoracic spine (deep to withers). (c) thehorsesback.com 

8.  Is there an identifiable change?

Sometimes, before and after photos are almost the same, but for minor changes that could be down to any of the above points.

They may be valuable, but they don’t show up much in images and take some explaining before they can be seen.

While some background information is helpful, if you’re having to write several paragraphs, then something is missing.

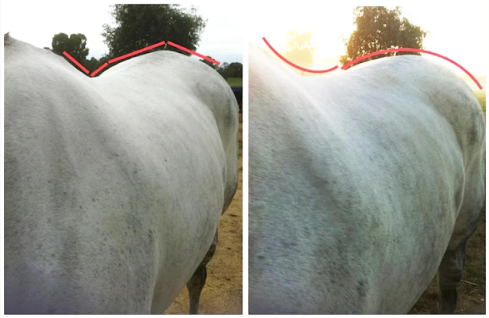
If you have to draw lines on the horse to show changed muscle development, then it’s also possible that your photos aren’t too clear.

Oblique body shots are really hard to repeat accurately. In the second image, the lens is further out from the shoulder and in a slightly lower position. This changes everything and detracts from the real improvements seen.

And if you’re doing this, DO draw them correctly. Tracing different outlines or arbitrarily changing a line from straight to curved fools nobody!

Good before and after photos need no explanation, because they create their own impact.


Summary: how to achieve great before and after photos

The best before and after photos are taken:

  • From the same angle.
  • With the same lighting.
  • During the same season.
  • When the horse is standing settled, square if possible.
  • When the horse is not doing anything else.
  • At the same point in the session.
  • After the same work beforehand.
  • When there is a clearly visible change.

This means setting your photos up carefully and being quite technical in your approach. While there’s no need to go full-on scientific, giving a little thought to reducing all the above variables could go a long way to making your photos more effective, both for yourself and other people.

In the end, it’s rarely possible to get everything perfect. What’s important is that enough is correct, so that the images show what can be achieved with bodywork as a vital part of an integrated management approach.

Filed Under: Bodywork, Viewpoint Tagged With: equine bodywork, equine massage, GA

All About That White Lacing On Your Horse’s Back

January 8, 2024 by Jane @ THB 10 Comments

White lacing patterns on either side of the horse’s spine: it’s amazing how many different explanations there are for this interesting coat change.

Even in veterinary texts, the definitions don’t always completely correspond.

After stumbling through my own misinterpretations some years back, I started to collect photos and descriptions in an effort to make sense of this – and to help my clients understand too.

So belt up and strap yourself in for a high speed run through the world of lacing – official name leukotrichia.

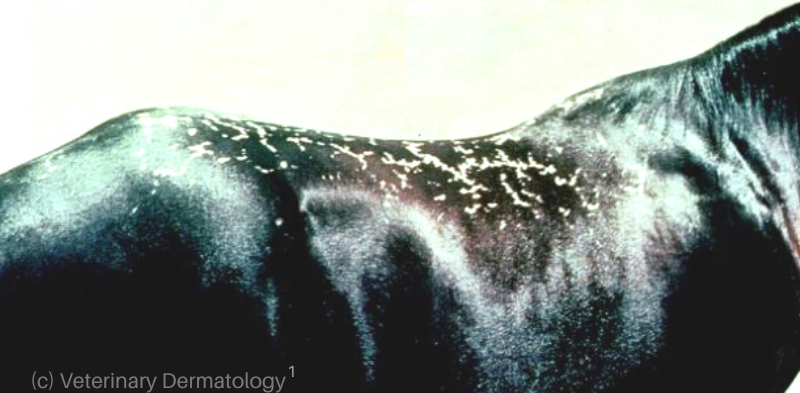
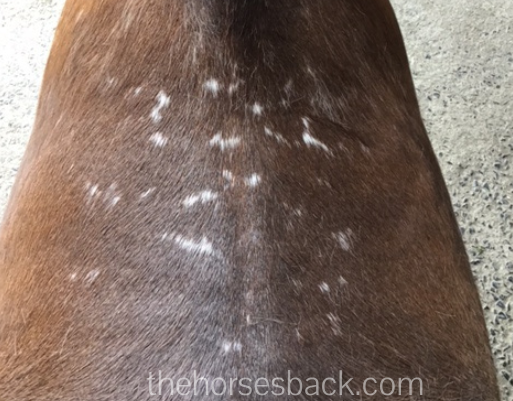
Early appearance of Leukotrichia. (c) J Clothier, thehorsesback.com

First, what does lacing look like?

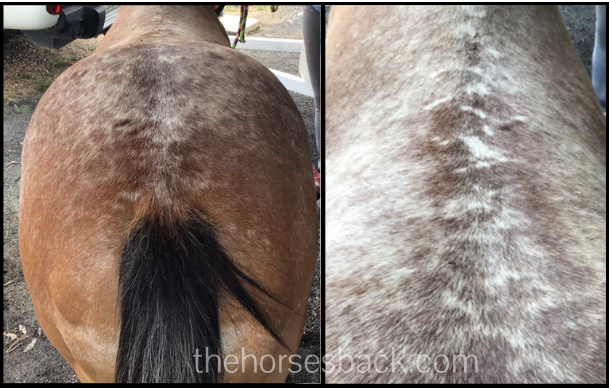
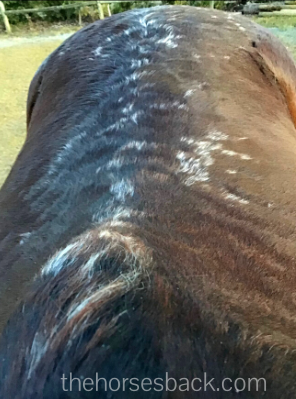
The name gives a strong hint, and the photos show it well, but basically these are linked white lines following a lace, herringbone or giraffe pattern (take your pick). Another term I’ve read is snowflakes (sweet!).

The pattern is generally symmetrical in its location, appearing on both sides of the spine. There may also be white hair patches along the spine itself.

Extending outwards, lacing often extends through the saddle area towards the tail, although smaller areas can also be seen.


The condition’s official name(s)

The umbrella term for these patterns of white markings that continue along and alongside the spine is Leukotrichia (spelled with either a ‘k’ or a ‘c’). ‘Leuko’ means white and ‘trichia’ means hair.

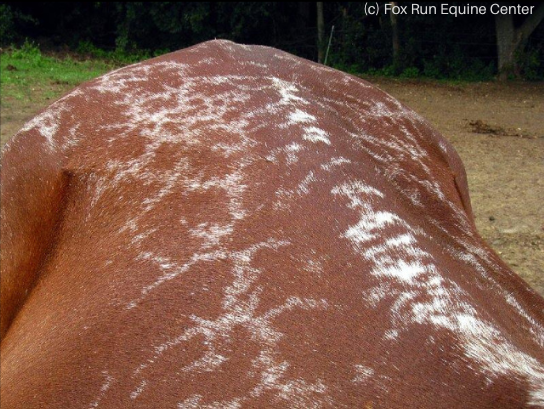
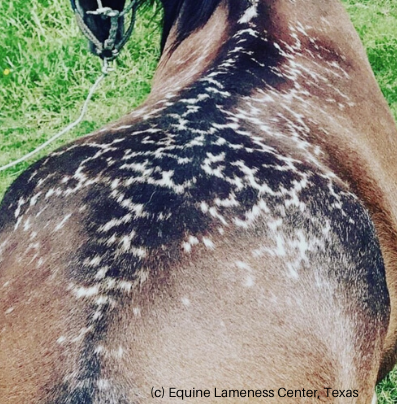
The lacing pattern is termed Reticulated leukotrichia – reticulated means ‘to resemble a net or a network’. When the pattern is seen in generations Quarter Horses or Paints, this is what is being genetically inherited. There is no pain associated with this.

Spectacular photo of Reticulated leukotrichia by Dr Brian S Burks, DVM, Fox Run Equine Center on Facebook.

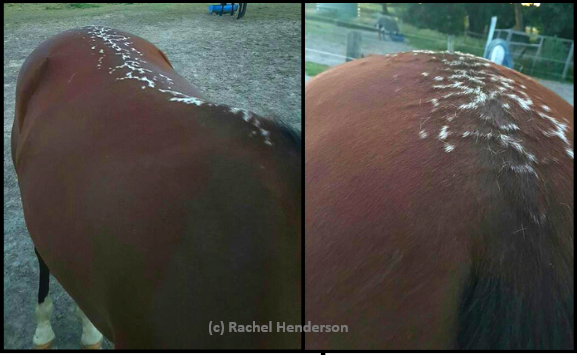
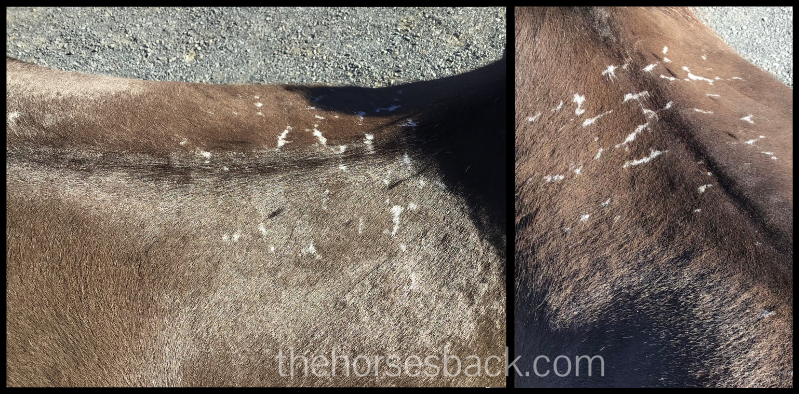
Now, there’s a different group that we’ve already touched on. When the horse has sore, crusted patches sized 1-4 cm, the condition is known as Hyperesthetic leukotrichia. Hyperesthetic refers to an unusual or pathological, often painful, sensitivity of the skin.

The marks left by Hyperesthetic leuktrichia are striking, but this horse was experiencing painful raised lesions. (c) R. Henderson, facebook.com/thehorsesbackblog


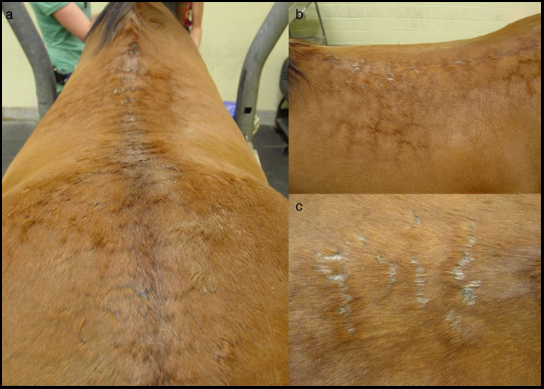
As the patterns appear, the coat can become raised with painful crusting and edema. Here, white hairs are appearing as the lesions heal. (c) Goodale Equestrian Center

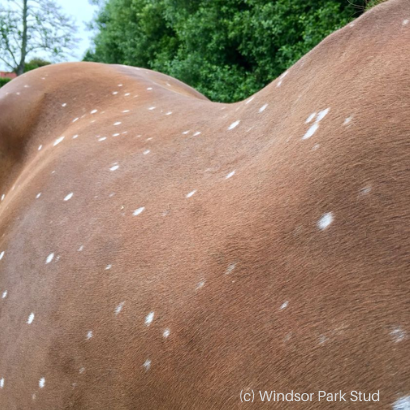
There’s one more version: when it presents as white spots sized 1-3cm along the back it’s called (wait for it) Spotted leukotrichia. And yep, those are the ‘birdcatcher’ spots that make a gradual appearance over time, usually in chestnut horses (which suggests the co-presence of a certain gene in these horses).

Spotted leukotrichia, named ‘birdcatcher spots’ after the Irish-born TB stallion Birdcatcher (1833) who displayed them. (c) Windsor Park Stud on Facebook.

How lacing first appears

Leukotrichia usually begins around the base of the withers and grows towards the tail, extending itself year-on-year.

Yes, it grows. How strange is that?

In cases of Hyperesthetic leukotrichia, a few areas of coat may become raised, with edema (fluid) beneath and the skin underneath growing sore. Crusts can develop. This is a variation – but we’ll come to that. As these lesions heal over the course of 1-3 months, the skin settles back down and the soreness eases. White hair grows through in what becomes a permanent colour change.

Lacing in a welsh pony mare. (c) J Clothier, thehorsesback.com

What causes lacing?

You may have heard one or more of the following explanations from veterinarians.

  • Genetics in certain breeds (usually QHs, but also Arabians).
  • Allergic reactions.
  • Responses to vaccines.
  • Reaction to viruses, including equine herpes.

I have met some horses that fit one of the above, and some that fit none.

I have simply been lucky enough to see quite a few, including its initial appearance in an Arabian yearling.

One veterinary theory is that the painful version is an immune-mediated skin reaction that follows an infection or another trigger – but there are no studies to provide evidence for this. In fact, one says it’s unrelated [2].

Photo of a remarkable case by Jessica Hamilton, DVM. Instagram @theequinelamenesscenter


One more surprising possibility…

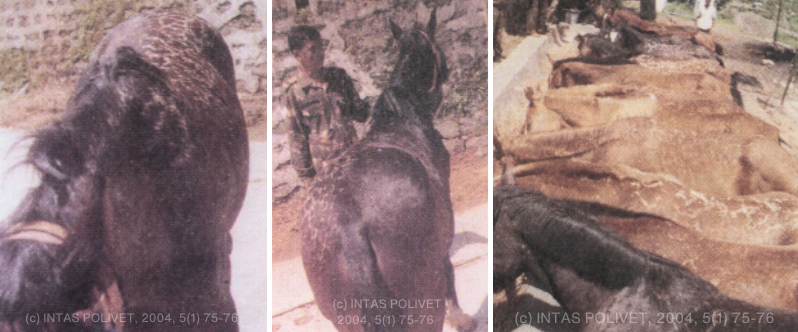
Just to stir things up a bit, an unusual Indian study reported cases of sun-induced Reticulated leukotrichia. 47 working horses and ponies were kept tethered for several hours a day with the sun on their left side for 8-15 months.

Guess what? They developed more lacing on the left side of their backs over the course of 8-15 months.

The photos are poor quality, but I’ve tweaked settings to show the lacing more clearly.

This wasn’t set up as a scientific study, but it’s extremely interesting. Leukoderma has been linked to sun damage [3], but ths is clearly leukotrichia.

Sharma, R., Solar radiation induced reticulated leukotrichia in Equines, INTAS POLIVET, 2004, 5(1), 75-76


What DOESN’T cause lacing?

You may also hear some of the following explanations.

  • Badly fitting saddles.
  • Pressure sores from other causes.
  • Back trauma.
  • Scarring from itching.
  • Parasites.

While the above can certainly cause white hairs through skin damage, they’re not responsible for the lacing we’re looking at here.

And of course yes, they can be present at the same time, but they’re still not the cause. Correlation does not equal causation!

With the appearance of lacing in certain breeds and in horses of certain colors, all we know is that those breeds or lines carry the same collection of genes.

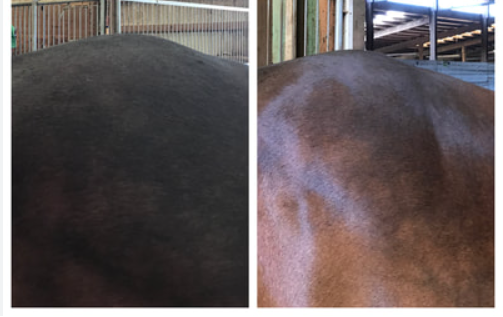
Lacing is harder to spot in a roan coat, but it is definitely there. Images show different times of the year. (c) J Clothier. thehorsesback.com

With Hyperesthetic leukotrichia, histopathology tests on active lesions show that a dermatological condition exists – i.e. a physical reaction is happening – without the precise cause or etiology being known. (Read more about the lengthy process of skin condition diagnosis here.)

What’s the outlook?

Many horses with Reticulated leukotrichia have the lacing, with no issues at all.

In the case of Hyperesthetic leukotrichia, there’s no way to stop the painful lesions appearing as the lacing develops.

This leaves us with providing topical skin management when painful lesions appear, keeping them clean and avoiding secondary infection, while not disturbing crusts.

This also means not brushing the painful area. If your horse is intensely sore, you may need to avoid placing a saddle on that painful skin as well.

The good news is that once the lesions are healed and the white hair grows through, horses don’t seem to experience any further pain.

And now you have yourself a talking point for the rest of your days together…


19-year-old Australian Stock Horse gelding, with lacing starting over the withers and extending to the tail. (c) J Clothier, thehorsesback.com

References

[1] Pigmentary Disorders. Veterinary Dermatology. 2000, 11:205-210. https://doi.org/10.1046/j.1365-3164.2000.00226.x

[2] Goodale EC, White SD, Outerbridge CA, Everett AD, Affolter VK. A retrospective review of hyperaesthetic leucotrichia in horses in the USA. Veterinary Dermatology. 2016, 27(4):294-e72. doi: 10.1111/vde.12327

[3] Rashmir-Raven, AM, Equine Internal  Medicine (4th ed). 2018.

.

.

Filed Under: Bodywork Tagged With: birdcatcher spots, color genetics, equine lacing, GA, lacing, leucotrichia, leukotrichia

When Half Breed Saddles Fit The Rider But Not The Horse

November 14, 2023 by Jane @ THB 3 Comments

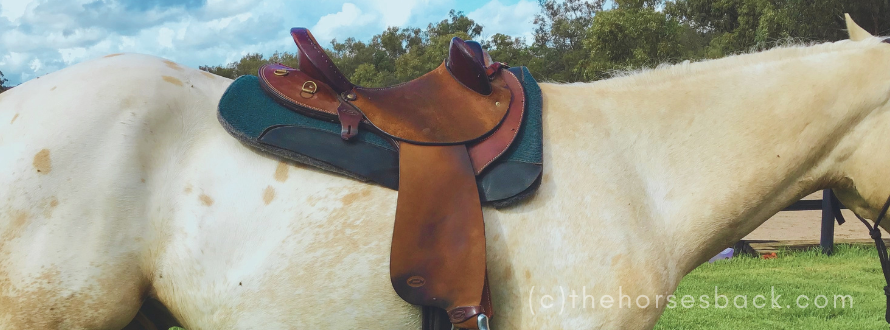
Although hugely popular, the Half Breed saddle is harder to fit to horses than its simple appearance seems to suggest.

As the love child of the Australian stock saddle and the Western saddle, its origins are on the station or farm, where riders spend long hours working cattle.

It offers the rider a lot of stability and security, while allowing freedom of movement when needed in stock work.

In Australia, it’s favoured in sports including campdrafting, team penning, or polocrosse. There are also many variations in endurance riding, while many leisure riders love this secure saddle.

However, its design does throw up some oft-seen fitting problems horse-side.

Caveat: If your saddle fits well, you’ve no reason to be concerned with what I describe here. If you’re not sure, then the following points are something to be aware of. It’s not an attack on this style of saddle or the sports that use it.

Why are Half Breed saddles so popular?

Note: This style is often called a Swinging Fender, which is becoming a catch-all name for a group of similar styles. Strictly speaking, the ‘Fender’ saddle has stuffed panels like the Aussie stock saddle – that’s not what we’re looking at here.

This style is favoured by many riders for a few reasons. I’ll hazard a few here:

  1. It feels safe and secure, thanks to the knee pads.
  2. You sit where it puts you, thanks to the knee pads.
  3. The seat is open and wide, therefore comfortable.
  4. It’s functional for working stock.
  5. It’s lighter than western saddles.
  6. It apppears to be easy to fit.
  7. It’s a good-looking saddle.

The sticking point is its apparent simplicity when it comes to fitting. There’s a prevailing belief that if it’s wide enough, it fits.

That’s simply not true. And nor does it become a better fit through the addition of a thicker pad.


What are the features of a Half Breed saddle?

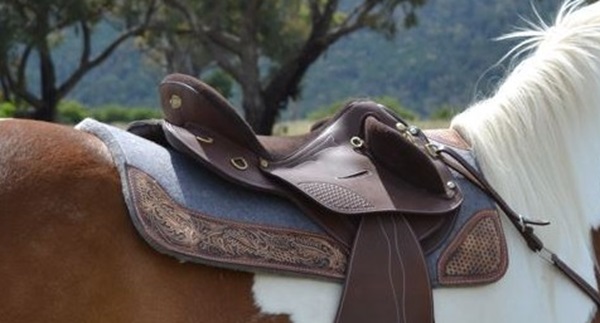
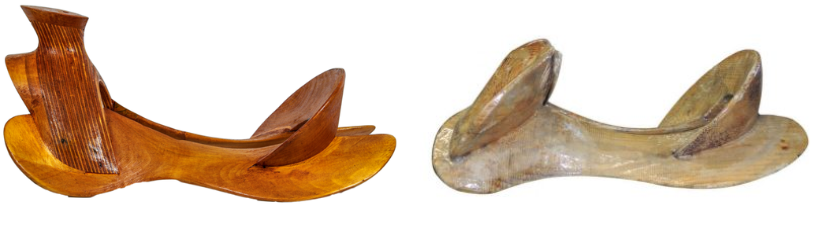
The tree is closer to a Western tree, but with a more forward-angled swell (ie. pommel area). It also has fenders and skirts like the Western, with an unpadded underside (which is why it’s always used with a thick saddle pad).

Meanwhile, the raised knee pads that offer so much security hark back to the Aussie stock saddle. A critical difference is that in the Half Breed saddle, they’re angled forwards.


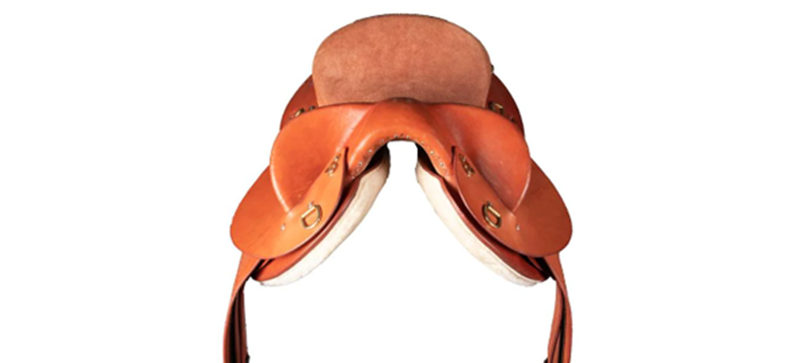
Western (left) and Half  Breed tree (right).


But what’s also important is this.

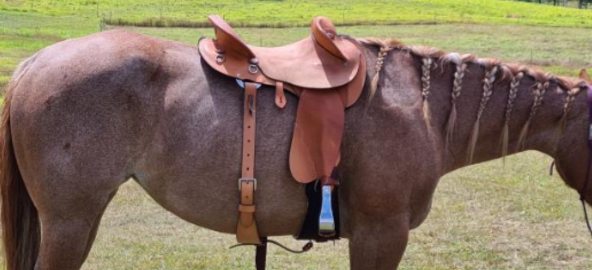
Like the Western saddle, the Half breed’s fit is harder to check underneath than English and Aussie stock saddles. It can often look fine from the outside, even when it’s not fitting the contours of the horse’s back at all.

Here are the varied ways and the reasons why Half Breed saddles can fail to fit. As you’ll see, they overlap and interlock to a surprising degree.


The forward sloping angles of the fork

As we’ve just seen, the swell of the Half Breed saddle (ie. pommel area) is angled forwards.

This provides a base for the knee pads, which suit a forward leg position for the rider.

The difficulty is that the bars frequently restrict the shoulder action, as the structure either extends forward above over the scapula cartilage or digs in behind it.

The forward angled bars frequently extend over and restrict the scapula cartilages.

The Trapezius and Rhomboid muscles are affected, with horses often showing tension and muscle maldevelopment, along with ‘hollowing’ along the topline.

Even so, the shoulder action can still lift and tilt the saddle back, which then causes it to slide back. It’s quite common to see the saddles used with breastplates for extra stability.

On top of this, the fixed position of the knee pads can force a rider’s butt further back as they adopt a ‘chair seat’. This leads to or contributes to a number of problems – more on this below.


The width and angle of the Half Breed saddle tree 

Half Breed saddle trees are often narrow in front and steeply angled.

These may suit lower weight, hard-working stock horses of Thoroughbred type, but can be disastrous for heavier horses, such as Australian Stock Horses with more Quarter Horse influence.

The shoulder action is often even more restricted by this narrowness. Once again, the saddle may be lifted in front and the saddle can tip back.

Alternatively, if the bars are pushing in behind the scapula, muscle atrophy can occur and then the saddle drops down in front. Thicker saddle pads may be added by a well meaning owner, but this doesn’t solve the problem – it compounds it.


The profile across the back of the tree

As mentioned, the back of the saddle gives the illusion that it’s simple to fit.

The plain skirt suggests that ‘what you see is what you get’ when compared with European saddles or Australian stock saddles.

However, there’s a solid tree in there, and the contour across the back of the tree needs to match that of the horse’s back.

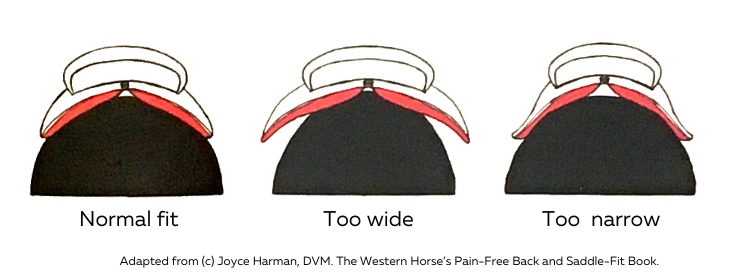
When the tree is too wide and flat, there’s often too much contact adjacent to the spine, and little to no contact further out.

This creates a higher level of pressure in the narrow contact areas.

If the saddle is already being tipped back, we have potential for a lot of postural change throughout the lumber spine and lumbosacral region of the horse.


The bridging Half Breed saddle

Can it get worse? Yes. Compounding all of the above, the saddle may bridge due to its close fit over the scapula cartilage.

Bridging means there are areas of strong contact and high pressure at the front and back of the saddle, and little in the middle.

It can sit clear or almost clear (you don’t need to actually see daylight) above the spinal curve beneath the saddle.

Add this to all of the above and things are getting pretty unpleasant for the horse. It’s certainly not unusual to see this, especially when bigger saddles are placed on horses that are croup-high, or downhill in conformation.


The seat balance of the Half Breed seat

Back to the angled swell and knee pads. These provide security for the rider, but leaves them little option but to sit further back.

This means they’re positioned some behind the centre of gravity ‘sweet point’, which is close behind the shoulders and withers.

The rider’s weight is levered to the back of the saddle, loading the back of the thoracic spine and possibly the more forward lumbar spine.


Photo by JS Photography. Cropped for privacy.

The horse’s tendency is to hollow or straighten the lumbar spine in an effort to manage the rider’s weight.

It’s common to see overdeveloped and hypertrophic lumbar muscles, along with an overstraight or raised lumbar spine.

This is not a criticism of a riding style. All saddles place the rider behind this sweet spot (as discussed in this earlier article),  but the issue is how far behind. Some saddles are more angled than others.


Useful saddle fitting resources

This article introduces the problems, so what about solutions?

The following resources provide more information on getting your saddle fit right.

Western Saddle Fit – The Basics 67-minute video on DVD or Vimeo streaming from Rod and Denise Nikkel

Western Saddle Fit: Well Beyond the Basics 6 hours for equine professionals from Rod and Denise Nikkel

The Horse’s Pain-Free Back and Saddle-Fit Book eBook from Joyce Harman DVM

The Western Horse’s Pain-Free Back and Saddle-Fit Book Soundness and comfort with back analysis and correct use of saddles and pads, from Joyce Harman DVM


Filed Under: Saddle Fit Tagged With: australian stock horse, GA, half breed saddle, halfbreed saddle, hybrid saddle, quarter horse, saddle fit, saddle fitting, saddle fitting problems, swinging fender saddle, western saddle

  • « Go to Previous Page
  • Page 1
  • Page 2
  • Page 3
  • Page 4
  • Interim pages omitted …
  • Page 9
  • Go to Next Page »

Footer

Contact Me

Send your questions this way…

Get in Touch

  • Store Support
  • Shipping
  • Returns
  • Contact

Copyright © 2026 · Parallax Pro on Genesis Framework · WordPress · Log in