• Skip to main content
  • Skip to footer

The Horse's Back

Body Talk for Thinking Owners

  • Home
  • Articles
  • BEMER
  • Store
    • Store
    • Shipping & Returns
    • Support
  • Equine Healthworks
    • Bodywork for Horses
    • Reviews
    • Leave a Review
  • About & Contact
    • About
    • Contact

Bodywork

Physio at Feed Time: Using Food to Mobilize Your Horse’s Body

October 18, 2024 by Jane @ THB 2 Comments

In this guest post, Tanja Kraus introduces variable feeding positions, which bring musculoskeletal benefits while also enriching your horse’s day.

As an equine educator from the East Coast of Australia, Tanja’s passion is using kind horsemanship philosophies and connection to develop a partnership horse with the rider.

This extract comes from her latest book, Lessons from Horses: Movement, whch provides insight into why and how our horses should be moving each day, with exercises to contribute to their physical health, mental wellbeing, and longevity.

She writes about variable feeding positions with the support of Dr Sharon May-Davis, who developed this combined feeding approach.

You can find Tanja’s books here.

All text is copyright of the author Tanja Kraus. No reproduction without permission.


The Day I Heard About Variable Feeding Positions and Horse Posture

I first heard about variable feeding positions when attending an Equine Symposium where Dr. Sharon May-Davis was presenting.

Sharon presented on variable feeding positions, and showed many examples of the benefits of variable feeding she had seen, both in wild horses and in domestic horses managed in this way.

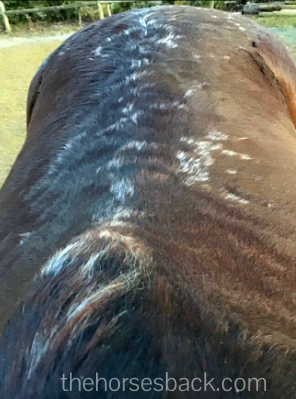
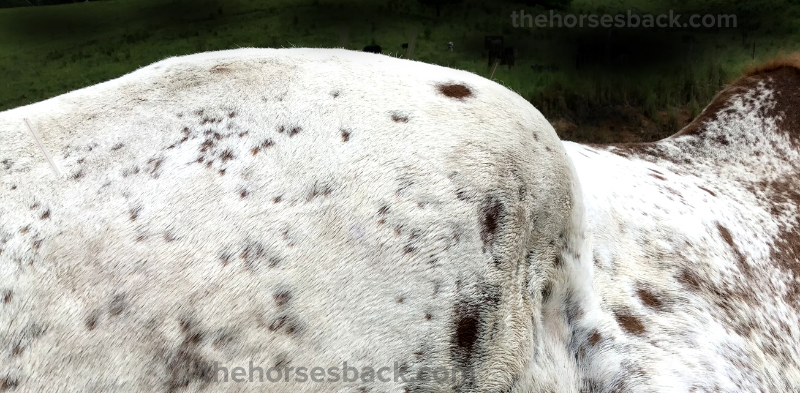
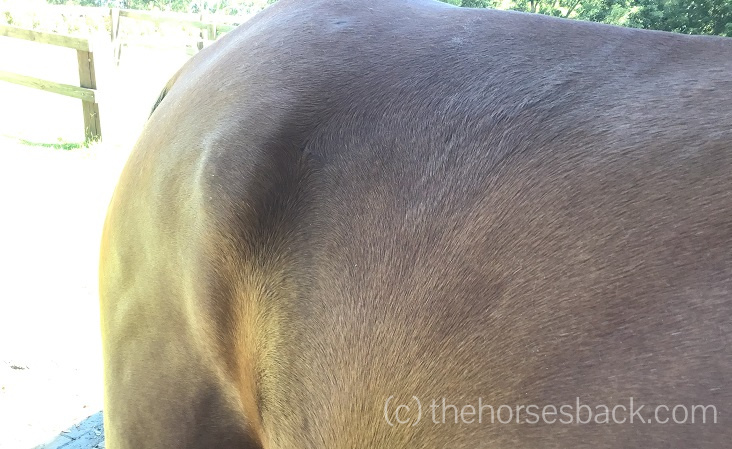
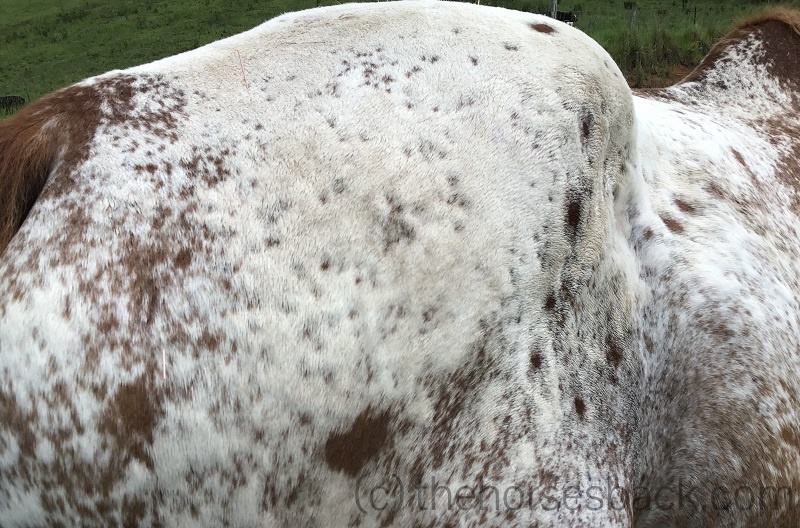
This included reduced asymmetry in the body, improved teeth and hooves, a more complete and balanced recovery from injury, and improved performance across multiple disciplines.

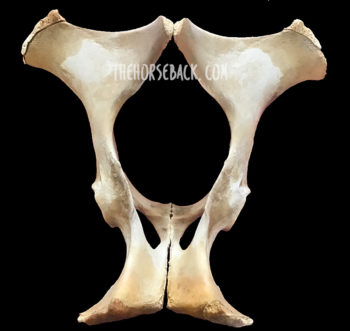
Comparing wild herds to domestic horses, she discovered that domestic horses with restricted lifestyles suffer with issues not only in the musculoskeletal system, but also uneven teeth wear. Jaw alignment and foot growth due to the limited postures.

Horses commonly ignore easy grass pickings to nibble from trees. (c) Hilary Graham

Natural Feeding Behaviors in Horses

As Dr May-Davis was talking, I was imagining my own horses and what I had seen them doing naturally in their paddock, and she was, of course, right.

My own horses who run in a herd of around 10 (give or take) in a paddock of varying terrain of about 40 acres adopt ‘variable feeding positions’ regularly and quite naturally.

And when I say regularly, I mean daily, through all the seasons.

So, they are not driven by lack of resources, which many people will argue ‘horses only eat out of trees when they have no choice’ – this is 100% incorrect.

My horses will happily roam their paddock and graze and browse and everything in between every day.

Images (c) Dengie: ‘Hedgerow Haynets for Horses’

We’re fortunate that our paddock contains a wonderful variation of pasture, different types of grasses, trees, and weeds that our horses can pick and choose from.

They are regularly seen choosing to eat ‘above the knee’, which is the measurement used to define browsing.

This can involve something as simple as eating the top of long grass around knee height, to completely outstretching their head and neck until their teeth are facing the sky to pull leaves from trees.

When you observe horses doing this, and pay attention to their bodies as they do it, you can see just how significant the range of motion is.

Horses extend their backs and stretch forward when eating from height. Indoor and outdoor spaces need to be large enough for them to do this.  (c) thehorsesback.com

Naysayers are often heard grumbling that horses ‘shouldn’t hollow their backs’ and that ‘high feeding is bad’ for this reason.

However, if you observe other animal species such as dogs and cats, they can all be seen stretching their spines by rounding and then hollowing.

And where would our own Yoga classes be without the classic ‘cat / cow’ pose?  Range of motion is healthy, natural and necessary.

Our domestic horses are often denied any type of variable feeding as we feed hay and hard feeds on the ground, and many horses are kept in paddocks that have limited access to appealing trees, shrubs, and long grass to facilitate variable feeding.

So how can we help?

Horses with good spinal mobility appear happy to eat from any angle on a hill. (c) Tanja Kraus


Offer Your Horses Variable Feeding Positions

Provide opportunity for variable feeding, with the following examples:

  • High hay fixed
  • High hay swinging
  • High feeder on rail
  • High feeder with ramp
One flake of hay per day in a swinging high net keeps this herd, which lives out, actively mobilizing their necks. (c) Sally Taylor

If hay has to go on the ground, you can make use of the natural lie of the land.

  • Feed on slope uphill / downhill
  • Hay scattered around to encourage movement
  • Multiple haynets and feeders to encourage movement
This mare stands square while eating on a gentle slope and raising her cervicothoracic spine. Note that she could stand at the top and eat virtually on the level if she preferred to. (c) thehorsesback.com

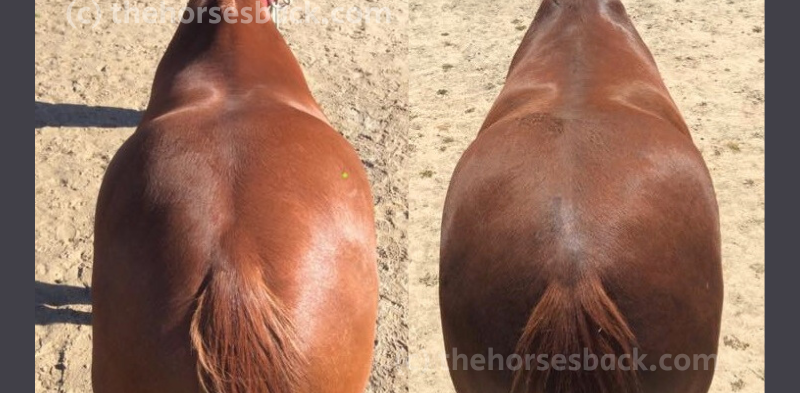
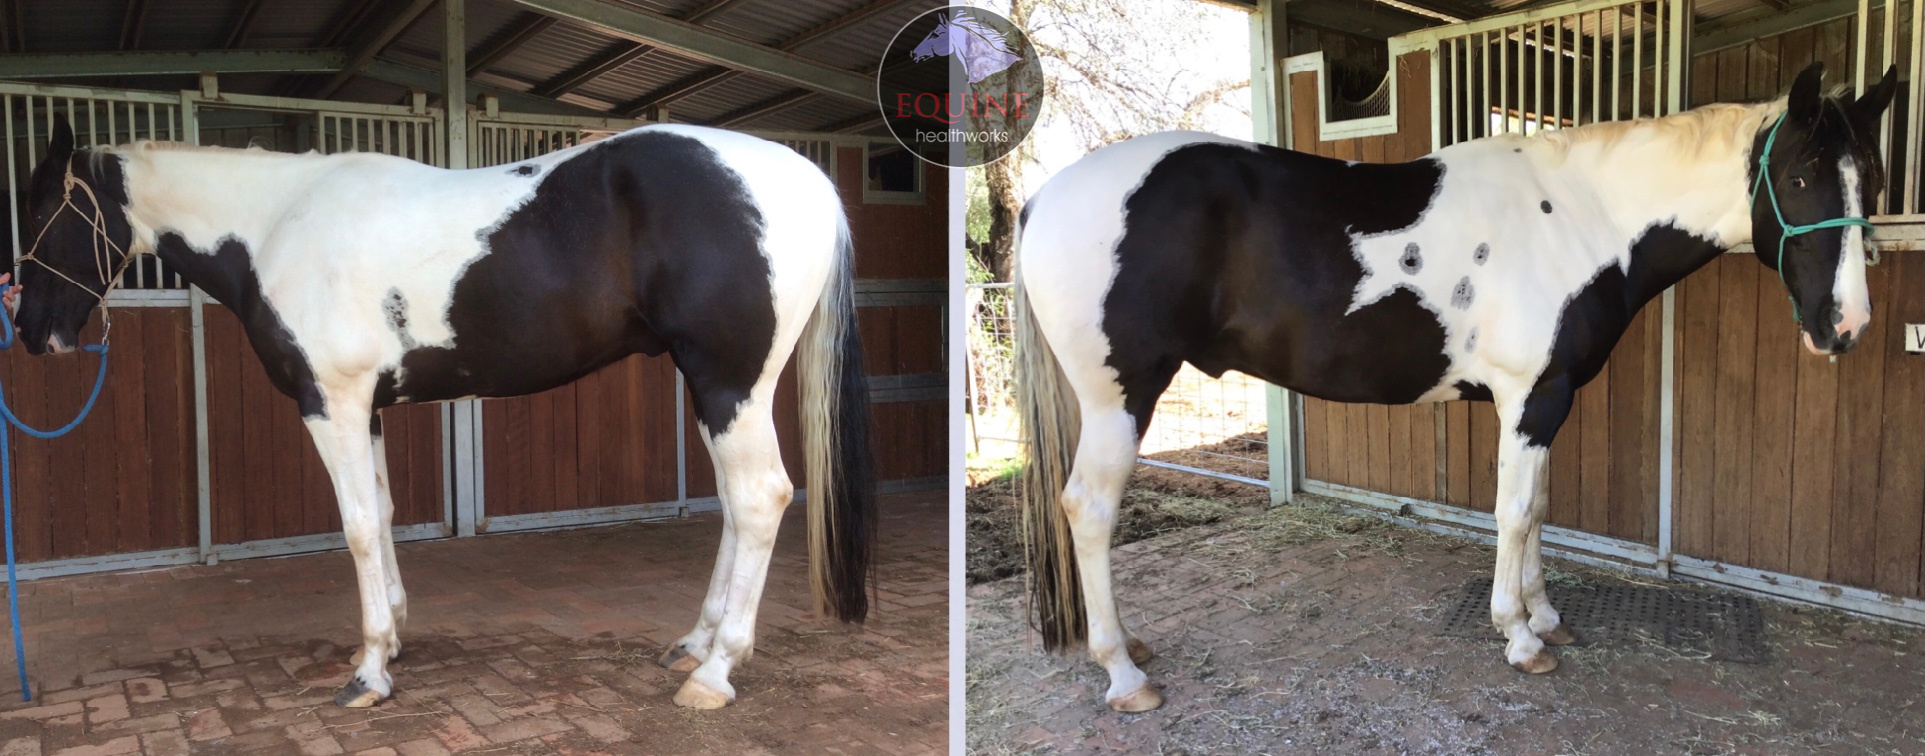
The Benefits of Variable Feeding Positions

Basically, we can try any variation from the usual static grazing position.

Feeding in variable positions can also be a useful ‘passive physio’ technique. They may find it harder at first, but it gets easier as their bodies become more supple and mobile.

It follows that horses being rehabbed from injury or restriction can be fed to encourage beneficial postures that activate or stretch particular muscles or body areas.

Gypsy needed encouragement to load an injured forelimb. Unlike most horses, she had been loading her hindquarters rather than her forehand. The gate encourages her to come forward and raise the lower neck. (c) thehorsesback.com

It’s important to note here that I have had some equine dentists express concern as they have seen terrible damage to horses’ teeth (namely racehorses) who are fed only in high feeders.

But, those horses are stabled and fed only in up positions, and therefore the grazing position is not a part of their daily routine. A recent study suggests there is no negative dental effect in horses using haynets for a period of one year [1].

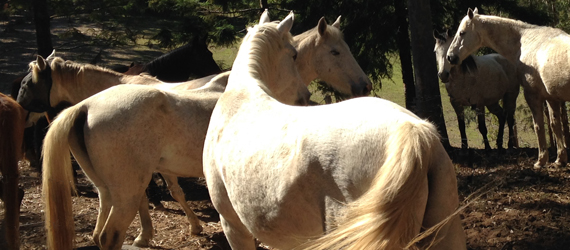
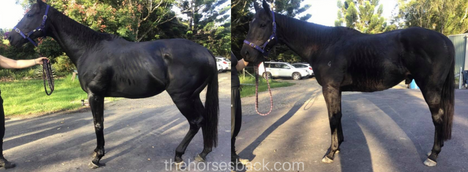
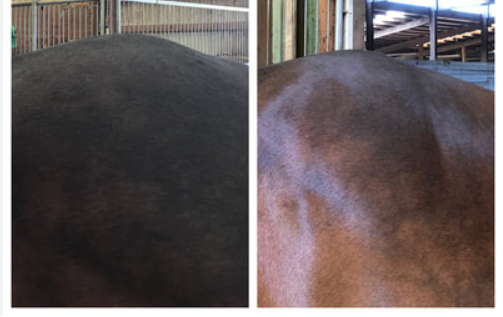
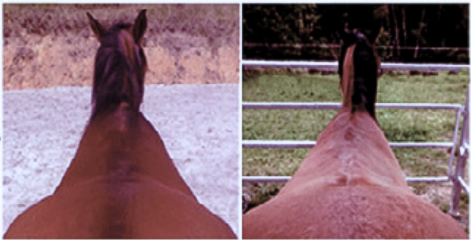
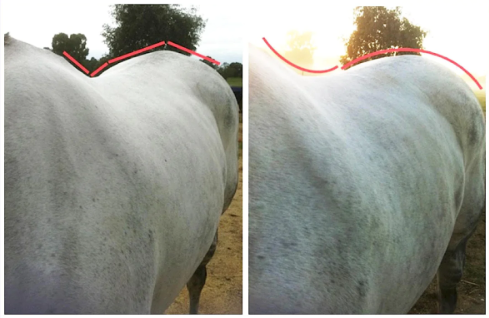
Below, these horses are fully mobilising their necks while eating from a shared large small-hole haynet – and from the ground. Note the near squared position of the grey mare, who suffered a fractured pelvis as a yearling.

We can also reverse engineer this – if your horse has an asymmetry, or difficulty working in one direction, is the way you position their feed having a negative effect?

Horses, when given the freedom to choose, graze approximately 80% of the time, and browse 20% of the time, and this balance should be sought when providing variable feeding positions for their benefit.


Solid and safe ramps and pedestals can be created to replicate environmental factors. (c) Footloose Barefoot Hooves

I have adopted variable feeding positions for my own horses, student horses, and for horses when they come in for training.

I’ve taken photos and filmed their start of variable feeding, and as they progress, and I have noticed a significant improvement in their posture while eating, along with their resting and grazing stances.

Depending on what you are trying to achieve there are many options, and the best part is the horse is doing their own physio in a gentle way.


Read more about enrichment in this blog post:  How Well Are We Doing? Why Some Horses Thrive While Others Just Get By
Reference
[1] Johnson L, Martinson K, Keener L, DeBoer, M. A preliminary study: Effect of hay nets on horse hay usage, dental wear, and dental conditions in mature adult horses. Journal of Equine Veterinary Science; 2023;124;104366; doi.org/10.1016/j.jevs.2023.104366.

Filed Under: Bodywork, Guest Posts, Sharon May-Davis, Viewpoint Tagged With: Equine Physio, equine posture, GA, horse posture, natural feeding horses, passive physio horses, Sharon May-Davis, tanja kraus, Tanja Kraus Horsemanship, variable feeding positions

BEMER And Bodywork: What I’m Seeing And Why I’m Hooked

May 26, 2024 by Jane @ THB 4 Comments

As a bodyworker, I’ve been using hands-on therapies to help horses for nearly 20 years. Only recently, I came across BEMER and decided to add this blanket and leg wraps to my practice, Equine Healthworks.

So how did I come across BEMER, what have I found, and – as a PhD-level critical thinker – what do I make of it?

Here, I explain how and why it fits into my holistic practice. I start with some observable effects in horses, then unpack these as to what might be happening, and finally explain where it sits in my view of how we work with horses.

Note: The following reflects my personal experience and views, and as such are anecdotal in nature. Always consult a veterinarian if you have concerns about your horse’s health. I am a BEMER UK partner presently in Australia and receive no compensation for this piece of writing.

Thoroughbred Broodmare
Thoroughbred broodmare receiving some assistance.

How I was introduced to BEMER

As a rule, I don’t jump onto bandwagons, especially where the-next-great-device is concerned.

I’m the marketer’s nightmare, being a seriously slow uptaker of new technologies. And that’s why I had my heels dug in very firmly when a UK friend first started telling me about BEMER.

But then, after a few years (I’m not kidding), I started to do some reading. I found scientific papers and anecdotal information that were variously good, bad, or on the fence. Much of the good science related to the ‘human’ BEMER forerunner of the equine version.

It was only when a very qualified European colleague offered to hand deliver my own BEMER and, what’s more, give a presentation to my clients AND stay with me and talk BEMER all weekend, that I finally took the plunge.

Since then, I’ve been near-obsessing over how this therapy device is producing such remarkable results in the horses I work with.

My initial observations

What surprised me immediately was the similarity of physiological effects arising from the BEMER and those arising from my bodywork.

  • Many horses show a response that suggests parasympathetic nervous system activation. There is visible dilation of blood vessels, particularly around the upper limbs. The pulse is visibly raised along the jugular groove. Horses ‘zone out’, with head lowered, eyes shut, and lips drooping. Then there are all the big sighs with licking and chewing… and the gut rumbles (peristalsis).

  • Additionally, sweat patches can appear, and muscle twitches (fasciculation) occur randomly.
  • Some horses don’t respond during the first session, but do so later, once they’re able to mentally ‘let go’. I work on  a second horse and look back to find that the first horse is now zoning and yawning, with the blood vessels raised.
  • And yes, the parasympathic state appears to be just a heartbeat away for the rest of the day and night.

In short, what I saw happening was what I’d been watching for nearly two decades of bodywork practice.

I’m a therapist/healer, yet this technology was producing crossover results – how?

What else have I seen happening?

Using the BEMER with equine clients gives me chance to stand back and watch, before assessing progress over multiple sessions.

  • Musculoskeletal

The horse’s muscles are softer when I start to work, vertebral joints free up more easily, and the ‘hard’ tension is often absent from the thoracolumbar fascia.

Horses will focus on a problem area as the effect is felt. They turn and look at it, or reach down to nuzzle a knee or foot. I see this as blood flow increasing in a restricted area, causing some form of prickling or tickling (actually, I’ve had personal experience of this with the human BEMER device).

Horse turns to look at problem area.
Horses often focus on areas where heightened sensations are felt, with locations confirmed during the bodywork that follows.

Certain areas of the body may sweat and these often correspond to known problem areas. I put this down to ‘ischemia’, the inward rush of blood to an area where supply has been compromised through injury or lack of use.

Sweat patch at an injury site post-BEMER
After a BEMER session, sweat appears at the location of an injury received a week before. Related ventral odema disappeared by the following morning.
  • Posture

Horses with bad hoof imbalances will shift around a lot. Again, I’m thinking about sensations felt when blood supply improves – and the hooves are certainly subject to a degree of blood perfusion that can be restricted or impaired. (And I hope that current hoof balance allows its restoration…)

This also happens with lumbar spinal and pelvic region issues – the horse shifts weight between the hinds as sensations increase.

Horses shift their weight and square up. I’m certain that there’s also an afferent effect from the signal – proprioceptive awareness increases or is restored.

Horses often shift weight and very deliberately square up during a session.
  • Injury

Bruising doesn’t happen when we might expect it to, for example, post-surgery. I’ve seen this absence (if that makes sense) in a pink-skinned horse – in that instance, the vet expressed surprise at lack of post-surgery bruising and swelling, without knowing BEMER had been used.

Swelling reduces rapidly or even fails to develop at all, as fluid (oedema) is swiftly moved.

  • Circulation

While it’s normal for veins and arteries to become raised under the skin during bodywork, this is even more intense as many tiny vessels also become dilated.

Even smaller blood vessels become dilated and raised
Vasodilation is a frequently seen bodywork effect, but here there has only been a few minutes with the BEMER.

In horses where an immune response is already visible, in the form of overdeveloped lymph nodes, hives, etc., signs can disappear overnight.

Dull horses become bright in the eye again. Horses with either no known or supposedly resolved veterinary issues, suddenly improve after a session or two. Health has been restored to an internal problem that we may have known nothing about and probably never will.

  • Temperament

Very anxious horses can respond with parasympathetic activation almost instantly, within the first 1-2 minutes. It is as if their exhausted nervous system is on a knife edge, ready to shift states. These horses appear to be have extreme sensitivity to the blanket, as befits this problem.

Paint mare responding to BEMER
Some stressed horses, like this anxious paint mare, respond within a couple of minutes of the BEMER being activated.

Not strictly bodywork-related but certainly client-horse-related: Performance horses can become more relaxed at events, and therefore more focused in classes. Quality of rest during their overnight stays appears to be improved.

I’ve also seen how separation anxiety at events can be drastically reduced through use of the blanket.

Swifter, more effective warm-ups are valuable for horses at all stages of their careers.

Unpacking these effects

Our appreciation of BEMER’s benefits must rest in understanding HOW and WHY circulation is often compromised, even in small degrees that we’d never usually be aware of.

Because, whether you’re coming to bodywork from the Western or Chinese perspective, adequate blood supply is the touchstone of life.

Some of the physical effects described here can be explained by the (researched and evidenced) fact that BEMER targets microcirculation, moving blood to the areas it needs to reach and where it has been restricted.

Restoring circulation quite clearly doesn’t mean simply warming up muscles – although it does do that. Basically, all the tissues in the body that receive blood are being nourished, something that is essential to the healing process.

As improved bloodflow returns, the horses often focus on an area of their body. I assume they’re experiencing a prickling or ‘pins and needles’ effect (again, I have experienced this directly). They don’t appear to be worried, although they can be distracted. The returning bloodflow also appears to create heat and unusual areas of sweat.

The horse often shows its awareness of where something interesting is happening in the body.

There’s a lymphatic effect too, as interstitial fluids leaked from capillaries are eased away from the tissue to start their journey via lymph vessels back to the heart. I assume the BEMER signal is stimulating this process, via the improved action higher up the circulatory network. Lymph vessels are also able to function more freely at ever level.

There simply has to be an improvement in nutritional uptake after illness. This is due to parasympathetic activation (‘rest and digest’), but another factor is starvation and lack of stimulation of digestive blood flow that’s associated with an low level of digestive processes (due to lack of food).  Blood collects nutrition from the gut to deliver through the body. And if the blood circulation has been depleted and is then stimulated… we are looking at multi-level improvements, at point of collection, transport, and delivery.

Recently rehomed, this malnourished riding pony produced some incredibly loud and prolonged gut sounds, enough to startle her and surprise her owner and I.

When less is more (or different)

This brings me to an important point. Again, it’s solely my personal viewpoint based on observations.

Many people using different modalities have different preferences and not all follow the same lines of thought, which is of course fine!

Yet some will always say that a device needs to run with greater intensity to reach ‘deep enough’ in the horse’s body.

To me, that’s like viewing the body as inert tissue that needs to be physically penetrated in some way.

The leg ‘cuffs’ are independent units, which gives scope for further targeted addresses on the limbs after the blanket session.

Devices that have greater strength or intensity work, of course they do. But very often I find that the key difference is not in whether high-powered or low-powered devices are more effective, but in how quickly that effect happens.

Even then, that’s not a hard and fast rule, as horses are individuals and any holistic approach brings different results in different individuals at different speeds.

Talking to the Central Nervous System

Due to my own hands-on work, I’m very aware that there’s no need to go heavy when stimulating change in the body.

My view is that you don’t need a hammer to crack this particular nut. Quite the opposite, in fact.

BEMER’s electrical frequency is tiny, yes. So is its magnetic density. But there’s a number one reason for that: it’s emulating a specific neuronal signal in the body.

And not just any signal: one that’s essential to maintaining the optimal health of all its tissues (more here).

And seeing this as a weakness is to do a serious disservice to the equine peripheral and central nervous system.

Why? Because light contact creates afferent impulses can bring about change.

And what does that mean?

Stimulated by touch, afferent (sensory) signals carry information to the brain, where it is integrated and processed. The brain then coordinates a response via efferent (motor) signals back to the rest of the body (more explanation here).

It’s Also What Feels Right To Me

The way we adopt technology in our work is a choice.

I believe that many tech devices work, but in different ways. I obviously have preferences. I would never have deep tissue massage or high velocity chiropractic for my own body and have no desire to administer anything that impactful to a horse either.

I think we can do better than that now, given what we know.

That’s why, due to the way that BEMER works – gently harmonising with the body to guide its systems back towards homeostasis – this device sits very comfortably within my practice.

And at last, I can understand what my colleagues have been going on about for so many years.


Below: Fresh from the paddock, this driving pony received a full body session and then extra focus on his neck.


BEMER: The World Leading Therapy Rug

BEMER: The World Leading Therapy Rug

How Does The BEMER Blanket Work?

How Does The BEMER Blanket Work?

Vets talk about the results they achieve with BEMER

Vets Discuss The Benefits Of BEMER

The Science to Date

What The Science Says About BEMER

BEMER: The Technical Specifications

BEMER: The Technical Specifications

BEMER And Bodywork: What I'm Seeing And Why I'm Hooked

BEMER And Bodywork: What I’m Seeing And Why I’m Hooked

Store for Your Whole Horse Care

Store for Your Whole Horse Care

Filed Under: Bodywork Tagged With: bemer, BEMER blanket, BEMER Equine, BEMER for horses, BEMER horse blanket, BEMER horse rug, BEMER horse set, BEMER rug, BEMER therapy, buy BEMER Australia, Equine BEMER, PEMF blanket, PEMF for horses, PEMF rug, PEMF therapy devices, PEMF therapy horses, what is pemf therapy

How to Create Better Before And After Photos of Horses (and Spot Misleading Ones)

February 22, 2024 by Jane @ THB 3 Comments

Bodyworkers love before and after photos. Done correctly, they can show great results of our work, making them powerful promotional tools.

Equally, if done incorrectly, they may say something rather different to what we want. In fact, there are many ways to leave areas of doubt and raise viewer questions. That’s why I rarely use them anymore.

To help you avoid some of the pitfalls, here are some pointers for making your before and after bodywork photos more effective.


1.  Make sure the horse is standing relaxed and in the same position

It sounds obvious, but so many people get this wrong.

In some photos, the horse is actually doing different things, or looks as if it has just paused during eating, stepping forward, looking into the distance, etc.

All of these things can change its posture, just as post-bodywork relaxation can. This is not comparing like with like.

The horse needs to be standing in a settled state. Standing square if possible, or otherwise in its default ‘parked’ position.

Either way, all four feet need to be on the ground, even if standing square isn’t possible.


Example 1: When the horse can’t stand comfortably

This OTTB was unable to stand without resting a hindlimb due to his sacroiliac and lumbosacral issues.

While this is part of his problem, and the owner and I knew that, nobody looking at the photos can be expected to know it. He looks like he’s just having a rest. If it’s not self-evident, it’s not worth using.

OTTB with hoof imbalance (negative plantar angles) and sacroiliac issues. Without appropriate hoofcare over time, his problems would simply persist. (c) thehorsesback.com


2. Use the same lens angle

This must be the second biggest error in before and after photos: One photo is taken with the lens angled slightly downwards, while the other is more level. This can unintentionally change how the horse’s outline looks.

Here’s how you can tell.

  • First, look at how the lens is positioned for good square-on conformational photos. It’s usually somewhere on the girthline, pointing horizontally around halfway up the horse’s body.
  • Now create an imaginary tracking line running in front of and behind each front hoof.
  • The distance between these lines should be roughly the same in both photo (when the horse is standing fairly straight).
  • If there’s a wider space in one photo, then the lens is probably angled downwards.
  • To compare like with like, the distance needs to be the same in both.
The distance between imaginary tracking lines can help show whether the lens angle is the same, or close to it. The horse is standing slightly wider in the first image, but the distances are still similar.


3.  Ensure the lighting direction is the same

This is simple to achieve, but so many people get it wrong.

Changes in lighting can highlight or obscure ribs, bony landmarks, tight muscles, you name it. There can be numerous changes to what we’re seeing.

Yet in some photos, the horse is in a different location, it’s a different time of day, or even indoors in one photo, and outdoors in the other.

To get a true and fair representation of the improvements, ensure the set up is close to identical in each photo, so that lighting changes don’t create a false impression.

Your great results need to shine on their own.


Example 2: Poor set up

These age-old, low res photos from my files were only taken as records over 15 years ago. Afterwards, I certainly wished I’d organised the taking of them better.

Taken at the start of session 1 and session 3, they show a change in coat colour. However, the passage of time and his weight gain can also account for this…

This TB had old fence injuries to the hindlimbs and lumbosacral issues. (c)thehorsesback.com

In this age of Canva, it’s not worth trying to explain changes that can come with other explanations.


4.  Take photos in the same season

All too often we see a before photo taken in winter, and an after photo taken in summer.

So guess what? The horse looks worse when it has a long, dull winter coat.

And it looks vastly improved in the summer, when it has a short, gleaming coat. Even more, it has a bellyful of tucker.

It’s better to avoid such a major difference, as it again only serves to obscure your great results.


Example 3: When it’s OK to break the rules 

The following photos of the paint horse were originally intended for my personal records. 

Shortcomings are clear: the horse is facing a different way; one photo is not fully square-on; horse is looking at camera; standing in a different location in the yard.

The strengths are big ones: same lens height and angle; lighting similar.

As this is about posture and not muscle development, the changes are unmissable. I gave credit to hoof balance improvement as well as bodywork.  

I would never plan to do a before and after in this way – if this horse’s changes had been minor, the photos wouldn’t have worked at all.


5. Include the legs!

It’s very common to see before-and-after photos showing only the horse’s back from a side-on view, or only the hindquarters from the rear.

This is to leave rather a lot of relevant information out of the image.

Why? Because without the limbs and/or head and neck in the image, your viewer can’t assess the horse’s posture.

Instead, they’re asking themselves questions such as: Is the horse standing square? Is it standing under or camped out? Is it angled away from the camera?

Most importantly, the simple matter of foot placement affects how the back and hindquarters appear in your two photos.

A close up image removes all the reference points that help viewers to understand what the image is supposed to show.

The exception is the overhead view down the back, as the legs obviously can’t be seen. In these cases, including the head and neck is helpful, as it says a lot about posture.

Example 4: Including extra information

Here are the full images of the WB used in the header for this post.

Both pics were taken in the same spot, but at different hours of the day. I couldn’t alter that, but it did mean that the sunlight was different and this accentuates the shoulder imbalance in the first picture.

What is important is that a lot is included in the images. This allows us to reference that the hindquarters are square-on and the head and neck position close to the same height.

I always explain that that the owner was also doing in-hand training with the horse, and had instigated hoofcare improvements.


6. Select the same stage in the session

You are not comparing like with like if your before photo is taken at the start of a session, and the after photo is taken at the end of a session. You may indeed be showing a valid change in the horse, BUT…

Many therapeutic approaches have a pain-relieving effect, which is often temporary. Posture can temporarily improve.

Once the effect wears off, the horse returns to experiencing the uncomfortable effects of its pathologies again. At this point, all the improvements may cease to be visible.

It’s a bit like taking a photo when the horse is on pain relief, and saying ‘here, look at this great change’.

A more valid comparison is to show the horse at the beginning of session one and then at the START of a later session.

This shows how the improvement has held once the horse returned to its regular routine.


Example 5: When a sequence works better

This Arabian was experiencing lumbosacral pain. As with the OTTB earlier, this caused him to constantly rest a hindlimb.

A sequence of photos throughout a session can create an engaging story that is interesting in its own right. (c) thehorsesback.com

A straightforward before and after would have been unconvincing.

On the other hand, a sequence of photos (we have both walks and short breaks during a session) shows him adjusting his posture. This reflects my focus on the day.


7.  Tell the whole story

Ahh, now here’s one that many people overlook when putting together before and after photos.

What was the horse doing the day before, or the day before that, or earlier the same day for that matter?

What else has been happening to the horse between visits that may have made a difference?

If the horse had completed a demanding event just before the first photo, then it’s possible that physical tiredness came into play.

If the horse has had rehabilitation in the form of hoofcare, new training or exercise protocols, a change of saddle, etc, between your visits, then that needs to be mentioned.

Hint: veterinary care is also important!


An old, low res image of an Arabian I worked on with fractured withers. The change in shoulder symmetry was due to work on the cervicothoracic spine (deep to withers). (c) thehorsesback.com 

8.  Is there an identifiable change?

Sometimes, before and after photos are almost the same, but for minor changes that could be down to any of the above points.

They may be valuable, but they don’t show up much in images and take some explaining before they can be seen.

While some background information is helpful, if you’re having to write several paragraphs, then something is missing.

If you have to draw lines on the horse to show changed muscle development, then it’s also possible that your photos aren’t too clear.

Oblique body shots are really hard to repeat accurately. In the second image, the lens is further out from the shoulder and in a slightly lower position. This changes everything and detracts from the real improvements seen.

And if you’re doing this, DO draw them correctly. Tracing different outlines or arbitrarily changing a line from straight to curved fools nobody!

Good before and after photos need no explanation, because they create their own impact.


Summary: how to achieve great before and after photos

The best before and after photos are taken:

  • From the same angle.
  • With the same lighting.
  • During the same season.
  • When the horse is standing settled, square if possible.
  • When the horse is not doing anything else.
  • At the same point in the session.
  • After the same work beforehand.
  • When there is a clearly visible change.

This means setting your photos up carefully and being quite technical in your approach. While there’s no need to go full-on scientific, giving a little thought to reducing all the above variables could go a long way to making your photos more effective, both for yourself and other people.

In the end, it’s rarely possible to get everything perfect. What’s important is that enough is correct, so that the images show what can be achieved with bodywork as a vital part of an integrated management approach.

Filed Under: Bodywork, Viewpoint Tagged With: equine bodywork, equine massage, GA

All About That White Lacing On Your Horse’s Back

January 8, 2024 by Jane @ THB 8 Comments

White lacing patterns on either side of the horse’s spine: it’s amazing how many different explanations there are for this interesting coat change.

Even in veterinary texts, the definitions don’t always completely correspond.

After stumbling through my own misinterpretations some years back, I started to collect photos and descriptions in an effort to make sense of this – and to help my clients understand too.

So belt up and strap yourself in for a high speed run through the world of lacing – official name leukotrichia.

Early appearance of Leukotrichia. (c) J Clothier, thehorsesback.com

pHix weight loss supplement

First, what does lacing look like?

The name gives a strong hint, and the photos show it well, but basically these are linked white lines following a lace, herringbone or giraffe pattern (take your pick). Another term I’ve read is snowflakes (sweet!).

The pattern is generally symmetrical in its location, appearing on both sides of the spine. There may also be white hair patches along the spine itself.

Extending outwards, lacing often extends through the saddle area towards the tail, although smaller areas can also be seen.

The condition’s official name(s)

The umbrella term for these patterns of white markings that continue along and alongside the spine is Leukotrichia (spelled with either a ‘k’ or a ‘c’). ‘Leuko’ means white and ‘trichia’ means hair.

The lacing pattern is termed Reticulated leukotrichia – reticulated means ‘to resemble a net or a network’. When the pattern is seen in generations Quarter Horses or Paints, this is what is being genetically inherited. There is no pain associated with this.

Spectacular photo of Reticulated leukotrichia by Dr Brian S Burks, DVM, Fox Run Equine Center on Facebook.

Now, there’s a different group that we’ve already touched on. When the horse has sore, crusted patches sized 1-4 cm, the condition is known as Hyperesthetic leukotrichia. Hyperesthetic refers to an unusual or pathological, often painful, sensitivity of the skin.

The marks left by Hyperesthetic leuktrichia are striking, but this horse was experiencing painful raised lesions. (c) R. Henderson, facebook.com/thehorsesbackblog


As the patterns appear, the coat can become raised with painful crusting and edema. Here, white hairs are appearing as the lesions heal. (c) Goodale Equestrian Center

There’s one more version: when it presents as white spots sized 1-3cm along the back it’s called (wait for it) Spotted leukotrichia. And yep, those are the ‘birdcatcher’ spots that make a gradual appearance over time, usually in chestnut horses (which suggests the co-presence of a certain gene in these horses).

Spotted leukotrichia, named ‘birdcatcher spots’ after the Irish-born TB stallion Birdcatcher (1833) who displayed them. (c) Windsor Park Stud on Facebook.

How lacing first appears

Leukotrichia usually begins around the base of the withers and grows towards the tail, extending itself year-on-year.

Yes, it grows. How strange is that?

In cases of Hyperesthetic leukotrichia, a few areas of coat may become raised, with edema (fluid) beneath and the skin underneath growing sore. Crusts can develop. This is a variation – but we’ll come to that. As these lesions heal over the course of 1-3 months, the skin settles back down and the soreness eases. White hair grows through in what becomes a permanent colour change.

Lacing in a welsh pony mare. (c) J Clothier, thehorsesback.com

What causes lacing?

You may have heard one or more of the following explanations from veterinarians.

  • Genetics in certain breeds (usually QHs, but also Arabians).
  • Allergic reactions.
  • Responses to vaccines.
  • Reaction to viruses, including equine herpes.

I have met some horses that fit one of the above, and some that fit none.

I have simply been lucky enough to see quite a few, including its initial appearance in an Arabian yearling.

One veterinary theory is that the painful version is an immune-mediated skin reaction that follows an infection or another trigger – but there are no studies to provide evidence for this. In fact, one says it’s unrelated [2].

Photo of a remarkable case by Jessica Hamilton, DVM. Instagram @theequinelamenesscenter


One more surprising possibility…

Just to stir things up a bit, an unusual Indian study reported cases of sun-induced Reticulated leukotrichia. 47 working horses and ponies were kept tethered for several hours a day with the sun on their left side for 8-15 months.

Guess what? They developed more lacing on the left side of their backs over the course of 8-15 months.

The photos are poor quality, but I’ve tweaked settings to show the lacing more clearly.

This wasn’t set up as a scientific study, but it’s extremely interesting. Leukoderma has been linked to sun damage [3], but ths is clearly leukotrichia.

Sharma, R., Solar radiation induced reticulated leukotrichia in Equines, INTAS POLIVET, 2004, 5(1), 75-76


What DOESN’T cause lacing?

You may also hear some of the following explanations.

  • Badly fitting saddles.
  • Pressure sores from other causes.
  • Back trauma.
  • Scarring from itching.
  • Parasites.

While the above can certainly cause white hairs through skin damage, they’re not responsible for the lacing we’re looking at here.

And of course yes, they can be present at the same time, but they’re still not the cause. Correlation does not equal causation!

With the appearance of lacing in certain breeds and in horses of certain colors, all we know is that those breeds or lines carry the same collection of genes.

Lacing is harder to spot in a roan coat, but it is definitely there. Images show different times of the year. (c) J Clothier. thehorsesback.com

With Hyperesthetic leukotrichia, histopathology tests on active lesions show that a dermatological condition exists – i.e. a physical reaction is happening – without the precise cause or etiology being known. (Read more about the lengthy process of skin condition diagnosis here.)

What’s the outlook?

Many horses with Reticulated leukotrichia have the lacing, with no issues at all.

In the case of Hyperesthetic leukotrichia, there’s no way to stop the painful lesions appearing as the lacing develops.

This leaves us with providing topical skin management when painful lesions appear, keeping them clean and avoiding secondary infection, while not disturbing crusts.

This also means not brushing the painful area. If your horse is intensely sore, you may need to avoid placing a saddle on that painful skin as well.

The good news is that once the lesions are healed and the white hair grows through, horses don’t seem to experience any further pain.

And now you have yourself a talking point for the rest of your days together…


19-year-old Australian Stock Horse gelding, with lacing starting over the withers and extending to the tail. (c) J Clothier, thehorsesback.com

References

[1] Pigmentary Disorders. Veterinary Dermatology. 2000, 11:205-210. https://doi.org/10.1046/j.1365-3164.2000.00226.x

[2] Goodale EC, White SD, Outerbridge CA, Everett AD, Affolter VK. A retrospective review of hyperaesthetic leucotrichia in horses in the USA. Veterinary Dermatology. 2016, 27(4):294-e72. doi: 10.1111/vde.12327

[3] Rashmir-Raven, AM, Equine Internal  Medicine (4th ed). 2018.

.

.

Filed Under: Bodywork Tagged With: birdcatcher spots, color genetics, equine lacing, GA, lacing, leucotrichia, leukotrichia

More Than a Blemish: How a Knocked Down Hip Can Affect Horses

August 2, 2023 by Jane @ THB 13 Comments

Appaloosa with severe fracture of tuber coxae

‘Knocked down hip’ is a common name for a fracture of the tuber coxae (point of hip). This is usually the result of a horse having an impact with a gate post, fence or trees, a barrel in a race, another horse’s hoof, or the ground.

A piece of bone is often completely displaced, disappearing downwards and forwards into the paralumbar fossa – the space between the transverse processes of the lumbar vertebrae, internal abdominal oblique muscle, and the last rib.

This displacement can then change the outline of the pelvis on the damaged side. That said, it isn’t always visually obvious, and many horse owners often don’t even know it has happened.

It’s the least damaging of pelvic fractures as it doesn’t involve a joint or compromise the pelvic structure, and for this reason it’s often said that its long term effects are purely cosmetic.

But does that really mean it has no lasting effects whatsoever?

This post presents a range of potential issues, from none whatsoever to an altered gait that affects performance, and explains why you should always thoroughly assess your horse for effects after a tuber coxae fracture.

(c) Jane Clothier, thehorsesback.com. With thanks to Dr Sharon May-Davis for checking this post and catching my errors.

pHix weight loss supplement

The elusive nature of the problem

I know a horse whose owner reported a succession of minor come-and-go issues in the hindlimb.

These either failed to warrant veterinary attention (there being no lameness) and with no diagnoses made when a vet was consulted. The problem was intermittent and elusive.

Older Arabian with a recent tuber coxae fracture
A recent fracture in a veteran Arabian, showing some swelling. (c) J Clothier, thehorsesback.com

There was no visible asymmetry and no muscle atrophy.

However, the horse was outwardly rotating the right stifle and swinging the leg outwards in the forwards (cranial) phase of the stride.

When I palpated the right tuber coxae, it had a section knocked away halfway up the bone.

Could there be a connection? Very likely!

Let’s take a closer look at the tuber coxae and how a fracture can affect the action of the hind limb on that side.

Why is the knocked down hip so common?

Besides being the widest point of the pelvis and therefore vulnerable to traumatic injuries of all varieties, the horse’s point of hip has another key weakness.

It’s part of a growth plate. It’s an epiphyseal plate, which means it’s separated from the main body of the pelvis by a physis, the line where bone is produced during growth in early life.

Growth plate on TB pelvis
9-yo TB pelvis, showing remaining growth plate at the tuber coxae (Note: some has broken away during cleaning). (c) J Clothier, thehorsesback.com

This means we’re looking at the ‘cap’ of the tuber coxae, which is a weaker cap of bone until at least 5 years of age, and often later depending on the breed.

These are vulnerable to getting displaced – the growth plate of the elbow (ulna) being another example.

Skeletal specimens such as the one in the image show us that even beyond 5 years of age, the growth plate may  not be fully attached and is a weaker structure. The tuber coxae in the mature horse still has a roughened surface due to muscle attachments, which gives it a rather open honeycomb structure. This makes it far easier to damage.


More than a cosmetic feature

The clue as to why this fracture can be damaging, even though it doesn’t affect the structural integrity of the pelvis, lies in its function.

Yes, its function. Even though it’s not a moving part, the tuber coxae is much more than a cosmetic feature. Like the withers and the elbow/ulna, its function is to provide an anchor for some important muscles.

It serves as the attachment point for muscles involved in flexing the hip and extending the stifle to move the entire hindlimb forwards (more on those later). For this reason, the attachment point needs to be extremely stable.

Anglo with tuber coxae fracture
Anglo gelding with tuber coxae fracture (c) J Clothier thehorsesback.com

The tuber coxae must serve as an anchor point in this way while powerful propulsive forces are conveyed via the pelvis to the spine.

That’s why the tuber coxae are tuberosities – they sit wide and proud and, like handlebars on a motorbike, remain relatively stable in spite of the forces being transmitted from the hind legs forward along the spine.

The location of the fracture

Although generally similar, tuber coxae vary in shape from horse to horse. Fortunately, as they come in matching pairs, it’s possible to identify damage by comparing one side to the other.

Visually, it can be easy to spot a horse with an old tuber coxae fracture due to its pelvic asymmetry. How visible generally depends on the fracture’s severity.

Alternatively, good old manual palpation can reveal its presence.

Here are the main possibilities. 

  1. Upper piece of bone is displaced
QH tuber coxae fracture
Quarter Horse with old tuber coxae fracture affecting the upper section of the tuberosity. (c) J Clothier, thehorsesback.com

The upper part of the tuber coxae (ie. dorsomedial aspect) may be chipped off. This is usually, but not always, a visible type of fracture, as the point of hip acquires a rounded appearance. This is generally what gives the knocked down hip its name. 

  1. Central piece of bone is displaced
Tuber coxae fracture WB gelding
Tuber coxae fracture showing loss of bone in the centre of the tuberosity (c) J Clothier, thehorsesback.com

In this case, both ends of the tuber coxae are intact, so the overall shape isn’t much different.

However, if you palpate carefully, there’s a divot in the middle where a chip of bone has been dislodged. Identifying this involves comparing both sides of the horse.

  1. Lower piece of bone is displaced
OTTB with old tuber coxae fracture
Ex-racehorse with displaced lower part of the tuber coxae. (c) J Clothier, thehorsesback.com

Only the lower part of the bone (ie. ventrolateral aspect) may be missing.

This is harder to see, but easy to feel: the tuber coxae’s ‘ledge’ is noticeably shorter.

This variation of the fracture is common as it’s the outer corner, the widest point, that’s been knocked off.

One study of 29 horses reported that when only the lower, outer aspect of the bone (caudolateral) was fractured, injured horses returned to work in around 3.5 months. [1]

  1. Whole tuber coxae is displaced
Appaloosa tuber coxae fracture
The entire tuber coxae is displaced and the horse has experienced severe muscle loss. (c) J Clothier, thehorsesback.com

In severe cases, the entire tuber coxae is displaced. The visual asymmetry is more obvious. It can also be more serious: with palpation, it may be possible to feel the wider, deeper section of bone remaining, where the ilial shaft becomes the ilial wing.

In the study, when the entire tuber coxae was fractured, the recovery period was longer at around 6.5 months from injury. [1]

Could there be more damage?

If the horse has fallen hard enough to fracture the tuber coxae, it may have damaged other areas of its pelvis too. The various sacroiliac ligaments are prime contenders, as is the sacroiliac joint itself, along with the lumbosacral joint.

Then there are the structures of the actual hip joint (acetabulum and coxofemoral) and head of the femur.

There may even be an incomplete fracture of the ilium that we don’t know about, or separation at the pelvic/pubic symphysis. A full veterinary assessment should always be sought if your horse is lame and you suspect a trauma. Radiographs, ultrasound and scintigraphy have been used to image the tuber coxae and identify the extent of the damage. [2]

Sometimes, palpation and left to right comparison is the only way to identify the damage to the tuber coxae, in this case on the right side. It’s possible (r) to see the dip in the bone once you know it’s there. (c) J Clothier, thehorsesback.com

On a more superficial level, a ridge of what feels like soft tissue can sometimes be moved over the remaining tuber coxae – this is where a muscle attachment or its associated tendon or fascia has been damaged.

Small masses may also be palpated, which may be displaced bone chips. Small avulsion fractures have been observed in young racehorses, at the attachment of the Superficial gluteal muscle.

If there’s a pain response when you palpate these, bear in mind that it may be a sequestrum – ie. a bone fragment that has caused a lingering infection. This needs veterinary attention.

Alternatively, as Dr Sharon May-Davis explains (having examined fractures in dissections), these may also be ‘repair jobs’ that have happened as a result of bleeds. Smaller lentil-sized masses are calculi, ie. mineralized lumps, while the larger grape-like masses are lipomas, caused when a specialized fat is deposited in an effort to repair damaged tissue.

Thoroughbred gelding ex racehorse
Off the track Thoroughbred with an old tuber coxae fracture. With more heavily built horses, the bone loss may be still harder to identify visually. [Brand obscured.] (c) J Clothier, thehorsesback.com

What are the lasting effects of a tuber coxae fracture?

If there are no further pelvic issues, the general view is that following recovery, the lasting effect of a tuber coxae fracture is little more than a cosmetic blemish.

Radiographic view of tuber coxae fracture
Dorsomedial-ventrolateral 50° oblique radiographic view of the tuber coxa of the ilium in a horse. Large bone fragement (arrow) displaced ventrally. (c) JAVMA, 234. 10.

Our study of 29 horses says that:

“The majority of horses in this study did have muscle atrophy or abnormal bony flattening over the affected tuber coxae. Horses with tuber coxae fractures have an excellent prognosis for returning to athletic use but will most likely have a permanent blemish associated with the area.” [1]

So, a couple of things here.

First, the horses in the study were sufficiently injured, ie. lame, for veterinary attention to be sought. This suggests the fractures were fairly severe, and it therefore follows that the fracture site would be noticeably different upon healing.

But second, what we don’t know about is the quality of the horses’ work post-recovery. They returned to their previous athletic work, but were they the same as before?

Ultrasound images of a fractured vs normal tuber coxae in the same horse. (c) IMV Imaging


One lameness text states that this may only affect the careers of dressage horses, because they look asymmetrical, and judges may mark down due to this imprecision. [3]

Otherwise, the assumption tends to be that the localised trauma is no more than a superficial injury that leaves only a visual blemish, with occasional minor changes in gait quality.

As to whether horses are left with just that, quite a few people believe otherwise.

In fact, the rise of manual therapies has led to a lot more observation of gait changes and anomalies, such as those in the horse mentioned earlier.

Even while writing this, I went out and placed my hands on two more horses with this fracture and a noticeable effect on their movement.

WB gelding with smaller fracture in the centre of the tuber coxae. [Brand obscured]   (c) J Clothier, thehorsesback.com

The most affected muscles

Down to the nitty gritty – why my concern?

Let’s take a look at the effect on some significant muscles that have origins on the tuber coxae, and the related effect on movement if these attachments are damaged through the fracture.

  • Tensor fasciae late

The Tensor fasciae late muscle originates on the tuber coxae and the gluteal fascia. It has multiple insertion points, including (via fascial connections) the crest of the tibia bone and the lateral patellar ligament.

Its job involves flexing the hip, while extending the stifle (femeropatellar joint) as the hindlimb comes forwards.

It has a stabilising effect on the stifle through its connection to the patella ligament in front and the tibia.

This muscle does lose function when its attachment is permanently damaged. Even if it’s a small area of bone that’s lost up there, the effect lower down is broader.

  • Superficial gluteal

This muscle originates on the rear side of the tuber coxae (caudal) and the gluteal fascia.

It inserts onto the femur at the third trochanter. Its job is also to help flex the hip, while adducting the limb (bringing it inwards).

  • Internal abdominal oblique

The Internal abdominal oblique muscle originates from the tuber coxae and the inguinal ligament, and inserts onto the cartilages of the last 4 or 5 ribs, the linea alba, and the prepubic tendon.

Dr Sharon May-Davis writes that this muscle becomes overworked when engaged in supporting a hind limb lameness, and hypertonic when “excessively aiding pelvic engagement or [adopting] a supportive role in hind limb lameness.” [5]

[Biomechanical issues follow below.]

Ex-racehorse with severe tuber coxae fracture
The Tensor fasciae lata muscle is compromised in this ex-racehorse with a tuber coxae fracture. (c) J Clothier, thehorsesback.com


The biomechanical issues…

I’m sure you can see where this is heading now.

If muscles dedicated to flexing the hip suffer from impaired function due to a tuber coxae fracture, there’s going to be a negative effect on movement.

The horse can still move its hindlimb and flex the hip, of course, but an element of fine tuning is going to be lost. At least.

There’s also going to be compensation from other muscles, a functional asymmetry, and some stress in joints.

Generally speaking, the more bone that’s lost, the larger the negative effect on hindlimb control on that side.

Here’s what I’ve observed in various horses on the side affected by a tuber coxae fracture.

1. Outward rotation of the femur

The stifle is angled outwards, and the foot lands toe out.

The horse is less comfortable working in the same direction as the fracture, ie with the fractured tuber coxae on the inside of a circle. I’m presuming there’s a lack of stabilisation from the Tensor fasciae late and reduced function in this muscle.

    Outward rotation of femur in Anglo gelding with fractured left tuber coxae. (c) thehorsesback.com
2. Overdevelopment of the Rectus femoris muscle

This is the largest muscle of the quadriceps and the only one that attaches to the pelvis. It’s responsible for flexing the hip and extending the stifle. I presume this hypertrophy is due to compensatory action.

3. Reduced function in the Superficial gluteal

This muscle is also responsible for flexing the hip. In cases with full tuber coxae fractures, this muscle is atrophied behind the point of hip, adding to the change in the outline of the hindquarters on that side.

4. Tension in the Iliacus muscle

Along with Psoas major, this muscle forms the Iliopsoas. I’ve presumed this tension from the positive responses to corrective moves for the Iliopsoas muscles on this side.

5. Lumbar imbalances

I’ve observed vertebral rotation and restriction, and painful tension in the caudal Longissimus dorsii muscles.

I assume this is due to the compensatory ‘swing and haul’ action required for protracting the hindlimb when there’s insufficient controlled flexion at hip level. Again, this would depend on the extent of the tuber coxae fracture.

Muscles that may also be directly affected

Depending on the anatomy of the individual horse, other muscles may also be affected. How much so depends on the extent of the fracture and the anatomical variations between individuals.

  • Iliacus muscle

Forming the Iliopsoas along with Psoas major, Iliacus is responsible for flexing and rotating the hip. It has an origin under the ilium and insertion on the lesser trochanter of the femur, along with the tendon of Psoas major.

  • Middle gluteal muscle

This massive muscle has multiple origins, including the ilium, and inserts onto the greater trochanter of the femur.

In some horses, the lateral edge of its origin on the ilium is close to the tuber coxae, and may be affected by a fracture. This major muscle is largely responsible for extending and abducting the hind limb (ie. moving it outwards, away from the body).

  • Accessory gluteal muscle

This smaller muscle is below the Middle gluteal, and works with it so closely that some texts describe it as part of the bigger muscle.

However, it is largely separate and has its own flat tendon that attaches to the greater trochanter of the femur. This insertion means that it also aids in abduction of the hind limb (ie. moves it outwards, away from the body).

Assessing the individual

In many cases, the apparently quick recovery from lameness can cause the horse’s owner to believe the fracture of a tuber coxae is of little consequence.

It may be true for some, but for others it may be more serious.

The only way to tell is to examine the horse as an individual, starting with a visual assessment and palpation with the hands, comparing one tuber coxae to the other.

The horse’s hind limb action should also be assessed for balance and evenness. The horse may not be lame, but may have limitations in its movement on the side of the fracture.

If muscles flexing the hip aren’t working as they should, other muscles may be compensating, and these in turn can lead to secondary pain.

If the effect on hindlimb action appears to be significant, it is worth considering veterinary imaging to measure the extent of the damage (although this can usually be felt).

At any rate, some rehabilitative work is probably going to be needed so that better muscle condition and strength can be developed on the fracture side.

Ultimately, in severe cases, we have to remember that ‘we can’t put back what’s gone’. This injury may well mean the horse is unsuited to certain sports.

But please, never assume that this is simply a cosmetic blemish.


References
[1] Dabareiner, R. M. and R. C. Cole (2009). Fractures of the tuber coxa of the ilium in horses: 29 cases (1996-2007). Journal of the American Veterinary Medical Association 234 10: 1303-1307.
[2] Pilsworth, R. C. (2003). Chapter 51 – Diagnosis and Management of Pelvic Fractures in the Thoroughbred Racehorse, Diagnosis and Management of Lameness in the Horse. M. W. Ross and S. J. Dyson. Saint Louis, W.B. Saunders: 484-490.
[3] Van Wessum, R. (2020). Lameness Associated with the Axial Skeleton. Adams and Stashak’s Lameness in Horses: 763-800.
[4] Ashdown, R. R.; Done, S. H.; Evans, S. A. (2000). Color Atlas of Veterinary Anatomy: Vol. 2: The Horse, 2nd ed. Mosby Elsevier: Edinburgh.
[5] May-Davis, S. (2023). Dissecting Out The Facts. Author’s workshop manual.


Filed Under: Bodywork Tagged With: equine anatomy, equine bodywork, equine knocked down hip, equine pelvis, equine skeleton, equine tensor fasciae lata, equine tensor fasciae late, equine tuber coxa, GA, horse pelvis, horse skeleton, horse tensor fasciae late, ilium fracture, knocked down hip, knocked down hip horses, pelvic fracture, pelvic fracture horses, point of hip, tuber coxa horses, tuber coxae

  • Page 1
  • Page 2
  • Page 3
  • Interim pages omitted …
  • Page 5
  • Go to Next Page »

Footer

Contact Me

Send your questions this way…

Get in Touch

  • Store Support
  • Shipping & Returns
  • Contact

Copyright © 2025 · Parallax Pro on Genesis Framework · WordPress · Log in

Red light / near infrared devices now in store! Dismiss